Wednesday, May 19, 2021

Apple MacBook Air M1 for Network Engineers Part 5

Welcome to part 5! If you haven't read parts 1-4, you can find them here:

Part 1 can be found at the link below: 
Apple MacBook Air M1 for Network Engineers Part 1

Part 2 can be found at the link below:

Part 3 can be found at the link below:
Apple MacBook Air M1 for Network Engineers Part 3

Part 4 can be found at the link below:
Apple MacBook Air M1 for Network Engineers Part 4


So how is the M1 working out?

I have been using the M1 as my daily driver for a few months now. It has far exceeded my expectations. The "Instant On" like an iPad still blows me away, battery life is unbelievable, the Retina screen is amazing, memory management is so good I just don't even think about how many applications I have open. 

Recently, I left work, came home, used it for a few hours web browsing, worked on Friday using it for probably 5 hours at three different sites, then Saturday morning I was web browsing and realized that it was at 39% battery! I can't wait until the plague is over and I get to spend 11-14 hours in airports and on planes with it. Oh, wait...

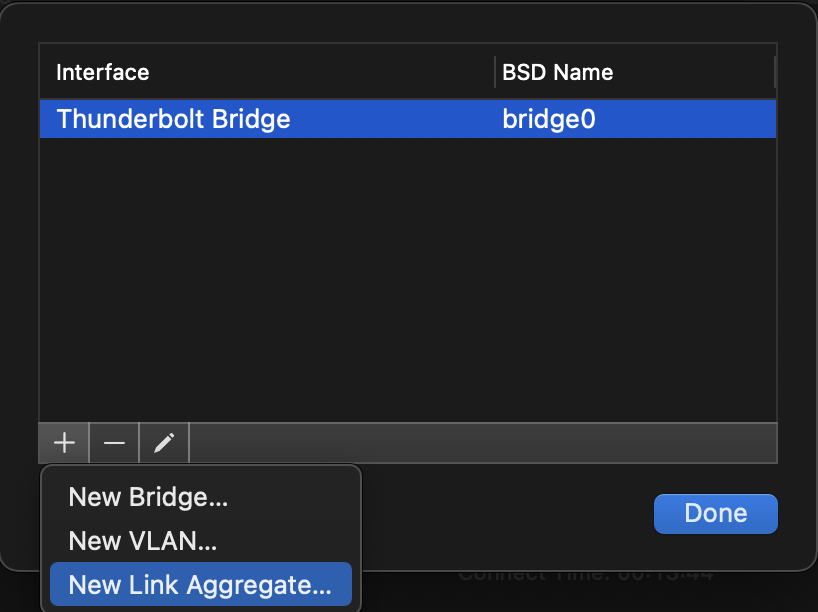
But it's not perfect! The M1 only has two USB-C Thunderbolt ports and the architecture of the M1 only allows a total of two displays - INCLUDING the Retina display. So even if you purchase two USB-C to HDMI adapters you can only drive one monitor. Since I have two 27" monitors in my home office and two 24" monitors at work this was disappointing. 

But, it turns out the two monitor limit does not apply to DisplayLink monitors. StarTech.com makes a USB-A to DisplayLink adapter that has two DisplayPort ports and Gigabit Ethernet. It drives both monitors no problem and I can still use the Retina display for a total of three monitors. You do have to go to the Displaylink Downloads page and install the macOS app. 

USB 3.0 Mini Dock - Dual Monitor USB-A Docking Station with DisplayPort 4K 60Hz Video & Gigabit Ethernet

Of course, being USB-A, you still have to use a USB-C to USB-A adapter. I bought two from Satechi.com that have three USB-A ports and one Gigabit Ethernet adapter. That leaves the second USB-C port available for charging so I can work all day on two monitors and still have two USB-A available and Ethernet. They are very high-quality adapters and I can't recommend them enough. If you sign up at Satechi.com you will get discount coupons in your inbox.

TYPE-C 2-IN-1 USB HUB WITH ETHERNET


In the field, I have been using another Satechi adapter - USB-C ON-THE-GO MULTIPORT ADAPTER. This one has 

  • USB-C PD charging
  • Gigabit Ethernet
  • 4K HDMI, VGA
  • USB-A
  • USB-C data ports
  • micro/SD card readers slots

The USB-C to C cable stashes inside the adapter, a really nice feature and it comes with a second, longer USB-C to C cable. I really like it because I can use the USB-C PD port for charging, use Gigabit Ethernet, an external monitor, and a USB-A device while still having the second USB-C port available. Plus, like the other Satechi adapter, it's very solidly built and feels like it will last even getting banged around in my backpack!


One last accessory that I am loving is an OIKWAN 10ft FTDI USB-C to RJ45 Serial Adapter. I didn't know that you could buy 10' cables but the extra length rocks. Plus, I don't need to put in a dongle just to use a console cable.


I found this Reddit post about USB-Serail chipsets. There is a lot of good information in it.
serial: With reliable macOS M1 support?


At this point, we have a macOS system running Big Sur with a great shell, a great terminal, the development tools needed to automate the network, and a vast collection of dongles! Now we will install and configure the tools that make macOS/Linux so much better than Windows.

Here is a list of the apps that we will be installing:

  • arp-scan - a command-line tool for system discovery and fingerprinting
  • bat - a replacement for cat with colorization
  • cdpr - a Cisco Discovery Protocol daemon
  • Debut WebCam software - Use an inexpensive endoscope on the m1.
  • Docker Desktop for macOS
  • duf - Disk Usage Free an ncurses interface for disk usage
  • exa - a replacement for LS that includes a lot of useful features
  • grepcidr - grep for IP subnets. A must learn tool
  • iPerf3 - An open-source link performance testing tool
  • lft - An alternative to Traceroute. Implements numerous network tracing methods and strategies.
  • lsusb - the Linux List USB tool. Useful when you want to see what USB devices are connected
  • lldp - an lldp daemon for macOS
  • mtr - A network diagnostic tool that combines the functionality of commonly used traceroute and ping programs into a single tool.
  • sipcalc - a terminal-based IP calculator
  • speedtest-cli - a terminal tool that calls the speedtest.net site.
  • tcp traceroute - a part of the IP route2 package from Linux. Useful to be able to use tcp instead of ICMP
  • tldr - cli interface to the website https://tldr.sh. Curated list of man pages with exmaples
  • Watch - Runs command repeatedly, displaying its output and errors
  • shellcheck - Linter for shell scripts
  • sc-im - Display csv files in the terminal. This is great for quickly reviewing csv files


Docker Desktop for macOS

Docker Desktop for Apple Silicon is now available for General Availability. You can download it here.

I recommend that you join the Docker Slack and then watch the docker-desktop-mac channel.

Use this link to get to the Docker Slack instance - https://dockercommunity.slack.com

The community is very active and they have solved a lot of issues.

Docker would require a book to go over, I am just going to show how to install the desktop and provide links to some good reference material.

References


EXA

A modern replacement for ls.
One of the most common tasks is listing files. Why spend your time squinting at black and white text?

exa is an improved file lister with more features and better defaults. It uses colours to distinguish file types and metadata. It knows about symlinks, extended attributes, and Git. And it’s small, 
fast, and just one single binary.

Installation

brew install exa

Examples

List with long, (F) Classify, Tree. 

Classify displays file kind indicators next to file names. 

exa -lFT


exa -lF --group-directories-first


I created an alias for the last command in the .zshrc file.

alias exa1="exa -lFT --group-directories-first"

Now I just have to type "exa1" to execute that long command.


References

Exa Website


fd

A replacement for find. This tool is amazing, the readme on GitHub has a lot of examples.

Features

  • Intuitive syntax: fd PATTERN instead of find -iname '*PATTERN*'.
  • Regular expression (default) and glob-based patterns.
  • Very fast due to parallelized directory traversal.
  • Uses colors to highlight different file types (same as ls).
  • Supports parallel command execution
  • Smart case: the search is case-insensitive by default. It switches to case-sensitive if the pattern contains an uppercase character*.
  • Ignores hidden directories and files, by default.
  • Ignores patterns from your .gitignore, by default.
  • The command name is 50% shorter* than find :-).

Installation

brew install fd

I'm not sure what program set the colors environment variable, it was set before installing fd, but this is what it looks like

echo $LSCOLORS                                                                                                   

Gxfxcxdxbxegedabagacad

fd then uses that to color its output


There is a companion tool called as-tree that you can pipe the output to and display the results in a tree.

brew install as-tree


References


grepcidr

grepcidr can be used to filter a list of IP addresses against one or more Classless Inter-Domain Routing (CIDR) specifications. As with grep, there are options to invert matching and load patterns from a file. grepcidr is capable of efficiently processing large numbers of IPs and networks.

grepcidr has endless uses in network software, including: mail filtering and processing, network security, log analysis, and many custom applications.

For detailed instructions and examples, please see the README file or man page. A couple examples of usage:

    grepcidr 2001:db8::/32 logfile

    grepcidr 66.249.64.0/19 access.log

Installation

brew install grepcidr

LLDP

Git hub repo with documentation

Installation

brew install lldp


LFT

LFT, short for Layer Four Traceroute, is a sort of 'traceroute' that often works much faster (than the commonly-used Van Jacobson method) and goes through many configurations of packet-filters (firewalls). More importantly, LFT implements numerous other features including AS number lookups through several reliable sources, loose source routing, netblock name lookups, et al. What makes LFT unique? LFT is the all-in-one traceroute tool because it can launch a variety of different probes using ICMP, UDP, and TCP protocols, or the RFC1393 trace method.

Official website 

Installation

brew install lft

References


MTR

This is a tool that runs continuously to ping the target and calculate the path like traceroute. There is a lot to this tool besides just pinging and tracerouting. You can save the output in CSV or JSON format, use IPv6 addresses, etc. You can use "man mtr" to open the man page or see the Tecmint.com article in the reference section.

Installation

MTR is part of the Homebrew collection. 

brew install mtr

The first time I ran mtr I got the error below:

┌─[mhubbard@HP8600-4] - [/private/tftpboot] - 
└─[$] mtr -4 199.244.248.19                                                                                 
mtr: Failure to start mtr-packet: Invalid argument

A google search found an issue on the mtr github page. I just had to add "/usr/local/sbin" to the path variable. I included a link in the references on how to do that in case you have the same issue.

How to use mtr

Example to www.vectorusa.com from my home lab. Note that you will need to use sudo with mtr.

┌─[mhubbard@HP8600-4] - [/private/tftpboot] - [2909]
└─[$] sudo mtr -4 www.vectorusa.com
HP8600-4.local (192.168.10.142) -> www.vectorusa.com                                         2021-08-30T19:20:25-0700
Keys:  Help   Display mode   Restart statistics   Order of fields   quit
                                                                             Packets               Pings
 Host                                                                      Loss%   Snt   Last   Avg  Best  Wrst StDev
 1. 192.168.10.254                                                          0.0%    14    4.1   5.7   3.6  25.2   5.6
 2. (waiting for reply)
 3. dtr01hsprca-tge-0-0-0-4.hspr.ca.charter.com                             0.0%    14   18.2  16.8  13.1  33.8   5.1
 4. 024-180-019-029.biz.spectrum.com                                        0.0%    13   14.4  15.6  12.3  26.2   3.5
 5. bbr02atlnga-bue-1.atln.ga.charter.com                                   0.0%    13   13.2  22.0  12.7  80.8  19.4
 6. bbr02chcgil-tge-0-2-0-1.chcg.il.charter.com                             0.0%    13   33.9  19.7  15.5  33.9   5.3
 7. 206.223.123.156                                                         0.0%    13   19.2  27.4  16.6  45.4  10.0
 8. 199.60.103.2                                                            0.0%    13   15.6  17.0  13.8  24.0   3.0


In this example, I added "-b" and "-y 0" to display the AS number and IP address:

┌─[mhubbard@HP8600-4] - [/private/tftpboot] - [2909]
└─[$] sudo mtr -4 -b -y 0 www.vectorusa.com
HP8600-4.local (192.168.10.142) -> www.vectorusa.com                                                2021-08-30T19:34:00-0700
Keys:  Help   Display mode   Restart statistics   Order of fields   quit
                                                                                    Packets               Pings
 Host                                                                             Loss%   Snt   Last   Avg  Best  Wrst StDev
 1. AS???    192.168.10.254 (192.168.10.254)                                       0.0%    19    3.7   4.2   3.3   7.8   0.9
 2. (waiting for reply)
 3. AS???    dtr01hsprca-tge-0-0-0-4.hspr.ca.charter.com (96.34.100.96)            0.0%    19   16.0  16.7  13.1  41.3   6.2
 4. AS20115  024-180-019-029.biz.spectrum.com (24.180.19.29)                       0.0%    18   17.4  17.4  13.2  26.2   3.7
 5. AS???    bbr02atlnga-bue-1.atln.ga.charter.com (96.34.3.18)                    0.0%    18   26.9  27.2  12.0  78.8  20.1
 6. AS???    bbr02chcgil-tge-0-2-0-1.chcg.il.charter.com (96.34.3.129)             0.0%    18   18.5  16.9  14.7  19.5   1.4
 7. AS396998 206.223.123.156 (206.223.123.156)                                     0.0%    18   18.6  24.8  15.4  37.6   8.1
 8. AS209242 199.60.103.2 (199.60.103.2)                                           0.0%    18   15.6  16.2  13.9  22.1   2.0


Using TCP or UDP instead of ICMP

sudo mtr --tcp -b -y 0 www.vectorusa.com
sudo mtr --udp -b -y 0 www.vectorusa.com


References


tldr

brew install tldr


┌─[mhubbard@HP8600-4] - [~/.ssh] - [3255]
└─[$] tldr mtr                                                                                                                        [20:34:50]

mtr

Matt's Traceroute: combined traceroute and ping tool.
More information: <https://bitwizard.nl/mtr>.

- Traceroute to a host and continuously ping all intermediary hops:
    mtr host

- Disable IP address and host name mapping:
    mtr -n host

- Generate output after pinging each hop 10 times:
    mtr -w host

- Force IP IPv4 or IPV6:
    mtr -4 host

- Wait for a given time (in seconds) before sending another packet to the same hop:
    mtr -i seconds host


Shellcheck


Installation

brew install shellcheck

To demonstrate the power of shell scripting, here is a shell script I found on Stackexchange.com that parses ifconfig and outputs:
  • Network Service
  • Interface Name
  • MAC address
  • IPv4 address 
of any active interface.

In this example, I had wifi and a USB-C Ethernet adapter connected.

bash networkservice.sh                                                                                                                                 [10:32:38]
Wi-Fi, en0, 50:ed:3c:22:be:32, 192.168.10.148
USB 10/100/1000 LAN, en11, 00:e0:4c:68:0a:0d, 10.10.100.2

If you want to include the IPv6 address, modify awk '/inet /{print $2}' and remove the space after inet.

Here is the script. Paste it into sublime text and then save it in a directory on your path. I created a folder - /Users/mhubbard/bin, to save tools in.

#!/bin/bash

while read -r line; do
    sname=$(echo "$line" | awk -F  "(, )|(: )|[)]" '{print $2}')
    sdev=$(echo "$line" | awk -F  "(, )|(: )|[)]" '{print $4}')
    #echo "Current service: $sname, $sdev, $currentservice"
    if [ -n "$sdev" ]; then
        ifout="$(ifconfig "$sdev" 2>/dev/null)"
        echo "$ifout" | grep 'status: active' > /dev/null 2>&1
        rc="$?"
        if [ "$rc" -eq 0 ]; then
            currentservice="$sname"
            currentdevice="$sdev"
            currentmac=$(echo "$ifout" | awk '/ether/{print $2}')
            currentIP=$(echo "$ifout" | awk '/inet /{print $2}')

            # may have multiple active devices, so echo it here
            echo "$currentservice, $currentdevice, $currentmac, $currentIP"
        fi
    fi
done <<< "$(networksetup -listnetworkserviceorder | grep 'Hardware Port')"

if [ -z "$currentservice" ]; then
    >&2 echo "Could not find current service"
    exit 1
fi


References


Debut WebCam software

I bought an inexpensive endoscope off of eBay for about $15.00. On Linux, it worked with the built-in Cheese webcam software. On the Mac I couldn't figure out how to get Facetime to work with it so I had to do some research. 

After I connected the endoscope, I ran lsusb (list USB) that I installed using "brew install lsusb" and it listed the following for the camera:

lsusb                                                                                                                                                              
Bus 001 Device 001: ID 2109:0817 VIA Labs, Inc. USB3.0 Hub
Bus 001 Device 003: ID 0bda:8153 Realtek Semiconductor Corp. USB 10/100/1000 LAN  Serial: 000001
Bus 001 Device 002: ID 2109:2817 VIA Labs, Inc. USB2.0 Hub
Bus 001 Device 004: ID 1e4e:0110 Etron Technology, Inc. USB2.0 Camera

So I knew that the M1 recognized the device. I searched for Etron Technology and found the company website. They had software so I downloaded it. But, I never install software from from the Internet without running it through VirusTotal.com. 17 AV vendors found Potentially Unwanted Programs (PUPs) in the Etron software.

The search also took me to the Logitech website for a package called "Capture". I found this in the description of Capture "Our webcams are USB Video Class (UVC) devices and driver support is built into Microsoft Windows 10 and macOS." So the endoscope must be a UVC device and the Mac has support built in.  

Back to the search and I found an application that is free for personal use and worked fine. It's called Debut and you can download it Debut webcam software. Virus Total reported 0 issues for Debut.

The resolution of the endoscope is listed as 640x480 so it's pretty bad. I checked eBay tonight and found a couple endoscopes that claim 720P and 1600 x 1200 for about $25. They also say the work with macOS so they must be UVC also. They also come with wifi adapters so that they work with Android and IOS phones. The 1600x1200 resolution would be much better than the 640x480 on the $15 endoscope I bought.

I can hear you asking "Why does a network engineer need an endoscope?". Well, I dropped a brand new Cisco 10Gb Single Mode Fiber SFP and it went down the channel of the two post rack. There were several APC UPS units and batteries all way to the bottom of the rack so there was no way to reach in and recover it. I had a claw type tool in my truck but I couldn't see that far down the channel to get the SFP. 

Luckily, I had spare SFPs and was able to come back after I got the endoscope. It has LEDs in it and I was able to use the endoscope to guide the claw to the SFP.  Tonight I used the endoscope to guide a 1/4" socket onto a nut on the ice maker on my freezer. But that's a story for another day. 

I was really more interested in explaining LSUSB and how to look at the USB devices that the M1 recognizes. 


sc-im

From the git repo:
Spreadsheet Calculator Improvised, aka sc-im, is an ncurses based, vim-like spreadsheet calculator.

Some of the features of sc-im

  • Vim movements commands for editing cell content.
  • UNDO / REDO.
  • 65.536 rows and 702 columns supported. (The number of rows can be expanded to 1.048.576 if wished).
  • CSV / TAB delimited / XLSX file import and export. ODS import. Markdown export.
  • Key-mappings.
  • Autobackup.
  • Direct color support - specifing the RGB values, screen colors can be customized by user, even at runtime.
  • Colorize cells or give them format such as bold, italic or underline.
  • Wide character support. The following alphabets are supported: English, Spanish, French, Italian, German, Portuguese, Russian, Ukrainian, Greek, Turkish, Czech, Japanese, Chinese.
  • Sort of rows.
  • Filter of rows.
  • Subtotals.
  • Cell shifting.
  • Clipboard support.
  • GNUPlot interaction.
  • Scripting support with LUA. Also with triggers and c dynamic linked modules.
  • Implement external functions in the language you prefer and use them in SC-IM.
  • Use SC-IM as a non-interactive calculator, reading its input from an external script.


This is a great utility for network engineers. I hate having to open Excel or Libre Calc just to grab some data from a csv file that was created for deployment. With sc-im I don't have to leave the terminal.

Here is a screenshot from a template I created for configuring several sites:


Installation

brew install sc-im

Once it's installed simply run

sc-im <file name>

in the case above:

sc-im rc-parks-idf_info.csv

Exiting sc-im

sc-im uses vim key bindings by default. They are listed on the github README. 

To quit, type ":q" and press enter

For reference, on Ubuntu, sc-im can open xlsx files.

An alias to view csv files.

If you just need to view a csv file with a limited number of columns, this alias works great


alias csv='ls *.csv | pbcopy ; sed s/,/,:/g $(pbpaste) | column -t -s: | sed s/,//g | cut -c-180'

Here is output of the alias in action:

csv                                                                                                                                                             [21:34:29]
column: line too long
Name                  IP             Site #  Name
voip-museum-g430      10.90.80.50    03      Museum
Voip-uoc-g450         10.80.152.5    05      Utilities Opration Center
voip-RPUgw-g430       10.80.30.50    06      RPU Gateway
voip-pucm-g450        10.80.138.50   07      Orange Square
voip-casa-g430        10.80.196.50   08      UOC-CRC
voip-SpringsSub-g430  10.80.160.50   09      UOC Springs Substation

Sunday, April 11, 2021

Apple MacBook Air M1 for Network Engineers Part 4

If you have been following along with parts 1-3, you now have macOS tuned up and some basic applications installed. If you need to review previous blogs in this series:

In part 4 we will:

In part 5 we will start installing terminal and networking applications like arp-scan, lldpd, cdpr, etc.

Using USB Ethernet Adapters

Big Sur makes it easy to configure USB Ethernet adapters using the Network Preferences app. Being a network engineer it's common for me to use two different USB Ethernet adapters at the same time. 

  • Connect one of the adapters
  • Open Network Preferences
  • Click the + sign on the bottom left of the panel
  • The new service dialog will open
  • Click the drop-down beside "Interface:" and select the adapter
  • You can give it a descriptive name or just click "create"

  • Repeat if you need a second adapter.
  • Connect Ethernet cables to the adapter and switch.

If both networks have DHCP running the interfaces will just come up. 

If there is no DHCP server available, the interfaces will show "Not Connected". That took a little getting used to since normally you think having a link will make the interface go into connected status. 

Note: if you change an adapter from DHCP to Manual or Manual to DHCP you have to click Apply before the change goes into effect.


Notice that the second USB Ethernet adapter has a "2" appended to it. In this example, both adapters are identical Satechi USB-C adapters with 3 USB-A ports.


Adding a route

If you need to reach additional networks connected to one of the adapters you will probably need to add a route. It's easy to add a route on MacOS. 

Let's say one of our adapters is connected to a surveillance network 10.29.1.0/24 with a gateway of .253. But there is another network 10.29.2.0/24 that you also need to access. You just need to add a route to 10.29.2.0/24.

Open Terminal

Type:

sudo route add 10.29.2.0/24 10.29.1.253


To display the routing table

netstat -nr
Routing tables

Internet:
Destination        Gateway            Flags        Netif Expire
default            192.168.10.254     UGSc           en0
default            10.29.1.253        UGScI          en9
10.29.1/24         link#22            UCS            en9      !
10.29.1.100/32     link#22            UCS            en9      !
10.29.1.253/32     link#22            UCS            en9      !
10.29.1.253        link#22            UHLWIir        en9      !
10.29.2/24         10.29.1.253        UGSc           en9
127                127.0.0.1          UCS            lo0
127.0.0.1          127.0.0.1          UH             lo0


To remove the route

sudo route delete 10.29.2.0/24 10.29.1.253

Note: The route won't be persistent. When you reboot it will be gone.


Add a second IP Subnet to a USB Ethernet adapter

This is a common requirement for a network engineer but it's not intuitively obvious how to do it on Big Sur!

For this example, I want to be able to send traffic on the 10.10.10.0/24 subnet.

Follow these steps:
  • Open the Network Preferences app
  • Click the "+" sign on the bottom left to add a new service
  • Next to "Interface:" pick the USB Ethernet adapter
  • Next to "Service Name:" enter a descriptive name.
  • Click Create


The new service will appear in the network preferences app. It will probably show as "Not Connected" because the default IP is set to DHCP. Change to "Manually" and enter the correct IP address, subnet and optionally a router IP. Click "Apply" to activate the change.

This is what the interface looks like in the terminal:


en9: flags=8963<UP,BROADCAST,SMART,RUNNING,PROMISC,SIMPLEX,MULTICAST> mtu 1500
	options=6467<RXCSUM,TXCSUM,VLAN_MTU,TSO4,TSO6,CHANNEL_IO,PARTIAL_CSUM,ZEROINVERT_CSUM>
	ether 00:e0:4c:68:0a:ab
	inet6 fe80::d6:bc89:db67:96ee%en9 prefixlen 64 secured scopeid 0x16
	inet 10.253.7.100 netmask 0xfffffc00 broadcast 10.253.7.255
	inet 10.10.10.100 netmask 0xffffff00 broadcast 10.10.10.255
	nd6 options=201<PERFORMNUD,DAD>
	media: autoselect (1000baseT <full-duplex>)
	status: active


Adding Vlan tagging

Again, Big Sur makes this easy but not obvious! In the network preferences app, click the funny little icon that looks like a circle with 3 dots in it:


  • Click on "Manage Virtual Interfaces..."


  • Click the "+" sign
  • Click on "New Vlan..."


In this example, I need to add Vlan 100

  • Next to "Vlan Name:" enter a descriptive name
  • Next to "Tag:" enter 100
  • Make sure "Interface:" is the USB 10/100/100 LAN
  • Click Create


The new interface will show up in the network preferences app. 


One annoying trait is that the interface will be named Vlan0 on the system no matter what Vlan tag you assigned. Output from ifconfig:

vlan0: flags=8843<UP,BROADCAST,RUNNING,SIMPLEX,MULTICAST> mtu 1500
	options=6063<RXCSUM,TXCSUM,TSO4,TSO6,PARTIAL_CSUM,ZEROINVERT_CSUM>
	ether 00:e0:4c:68:0a:ab
	inet6 fe80::27:216d:4729:6c0d%vlan0 prefixlen 64 secured scopeid 0x18
	inet 10.10.10.100 netmask 0xffffff00 broadcast 10.10.10.255
	nd6 options=201<PERFORMNUD,DAD>
	vlan: 100 parent interface: en9
	media: autoselect (1000baseT <full-duplex>)
	status: active


Here is the switch port configuration that the USB adapter is connected to:
interface 1
   name "Uplink"
   tagged vlan 86,100
   exit


Here is the Vlan 100 configuration:
vlan 100
   name "Management"
   tagged 1
   untagged 3-24
   ip address 10.10.10.254 255.255.255.0
   exit


Here are the ping results:
ping 10.10.10.254
PING 10.10.10.254 (10.10.10.254): 56 data bytes
64 bytes from 10.10.10.254: icmp_seq=0 ttl=255 time=2.447 ms
64 bytes from 10.10.10.254: icmp_seq=1 ttl=255 time=1.624 ms
^C
--- 10.10.10.254 ping statistics ---
2 packets transmitted, 2 packets received, 0.0% packet loss
round-trip min/avg/max/stddev = 1.624/2.035/2.447/0.412 ms


Using Wireshark to verify the Vlan tagging

Wireshark on macOS can capture traffic and show the Vlan ID but there is a caveat. Even though we created the Vlan0 service and set it to Vlan 100, you must select the parent interface in wireshark. In our case that is en9.


Notice that VLAN100: vlan0 and USB 10/100/1000: en9 show the same amount of traffic in the wireshark capture display.


Here is a snippet of traffic showing that it is indeed tagged on Vlan 100
Ethernet II, Src: HewlettP_fe:88:80 (98:f2:b3:fe:88:80), Dst: RealtekS_68:0a:ab (00:e0:4c:68:0a:ab)
    Destination: RealtekS_68:0a:ab (00:e0:4c:68:0a:ab)
        Address: RealtekS_68:0a:ab (00:e0:4c:68:0a:ab)
        .... ..0. .... .... .... .... = LG bit: Globally unique address (factory default)
        .... ...0 .... .... .... .... = IG bit: Individual address (unicast)
    Source: HewlettP_fe:88:80 (98:f2:b3:fe:88:80)
        Address: HewlettP_fe:88:80 (98:f2:b3:fe:88:80)
        .... ..0. .... .... .... .... = LG bit: Globally unique address (factory default)
        .... ...0 .... .... .... .... = IG bit: Individual address (unicast)
    Type: 802.1Q Virtual LAN (0x8100)
802.1Q Virtual LAN, PRI: 0, DEI: 0, ID: 100
    000. .... .... .... = Priority: Best Effort (default) (0)
    ...0 .... .... .... = DEI: Ineligible
    .... 0000 0110 0100 = ID: 100
    Type: IPv4 (0x0800)


A word about IPv6

If you look back at the output of ifconfig for the vlan0 interface you will notice an IPv6 address was created but it ends in %vlan0.

inet6 fe80::27:216d:4729:6c0d%vlan0 prefixlen 64 secured scopeid 0x18


To ping that interface we would use:

ping6 -I vlan0 fe80::27:216d:4729:6c0d
PING6(56=40+8+8 bytes) fe80::27:216d:4729:6c0d%vlan0 --> fe80::27:216d:4729:6c0d
16 bytes from fe80::27:216d:4729:6c0d%vlan0, icmp_seq=0 hlim=64 time=0.158 ms
16 bytes from fe80::27:216d:4729:6c0d%vlan0, icmp_seq=1 hlim=64 time=0.262 ms
16 bytes from fe80::27:216d:4729:6c0d%vlan0, icmp_seq=2 hlim=64 time=0.228 ms
16 bytes from fe80::27:216d:4729:6c0d%vlan0, icmp_seq=3 hlim=64 time=0.340 ms


Using show management on the switch will list it's IPv6 address

Address    |                                             Address    
  Origin     | IPv6 Address/Prefix Length                  Status     
  ---------- + ------------------------------------------- -----------
  autoconfig | fe80::9af2:b3ff:fefe:8880/64                preferred  


Let's see if we can ping the switch on Vlan 100 using IPv6:

ping6 -I vlan0 fe80::9af2:b3ff:fefe:8880
PING6(56=40+8+8 bytes) fe80::27:216d:4729:6c0d%vlan0 --> fe80::9af2:b3ff:fefe:8880
16 bytes from fe80::9af2:b3ff:fefe:8880%vlan0, icmp_seq=0 hlim=64 time=3.237 ms
16 bytes from fe80::9af2:b3ff:fefe:8880%vlan0, icmp_seq=1 hlim=64 time=1.498 ms
16 bytes from fe80::9af2:b3ff:fefe:8880%vlan0, icmp_seq=2 hlim=64 time=1.853 ms
16 bytes from fe80::9af2:b3ff:fefe:8880%vlan0, icmp_seq=3 hlim=64 time=1.865 ms
16 bytes from fe80::9af2:b3ff:fefe:8880%vlan0, icmp_seq=4 hlim=64 time=1.374 ms
^C
--- fe80::9af2:b3ff:fefe:8880 ping6 statistics ---
5 packets transmitted, 5 packets received, 0.0% packet loss
round-trip min/avg/max/std-dev = 1.374/1.965/3.237/0.665 ms


You can also use this format of ping6. Notice the %vlan0 after the IPv6 address. If you were using interface en7 instead of vlan0, you would append en7 to the IPv6 address instead.

ping6 fe80::9af2:b3ff:fefe:8880%vlan0
PING6(56=40+8+8 bytes) fe80::27:216d:4729:6c0d%vlan0 --> fe80::9af2:b3ff:fefe:8880%vlan0
16 bytes from fe80::9af2:b3ff:fefe:8880%vlan0, icmp_seq=0 hlim=64 time=1.365 ms
16 bytes from fe80::9af2:b3ff:fefe:8880%vlan0, icmp_seq=1 hlim=64 time=0.815 ms
16 bytes from fe80::9af2:b3ff:fefe:8880%vlan0, icmp_seq=2 hlim=64 time=0.848 ms
16 bytes from fe80::9af2:b3ff:fefe:8880%vlan0, icmp_seq=3 hlim=64 time=0.724 ms
16 bytes from fe80::9af2:b3ff:fefe:8880%vlan0, icmp_seq=4 hlim=64 time=0.771 ms
^C
--- fe80::9af2:b3ff:fefe:8880%vlan0 ping6 statistics ---
5 packets transmitted, 5 packets received, 0.0% packet loss
round-trip min/avg/max/std-dev = 0.724/0.905/1.365/0.234 ms


Excellent, now let's check the SSH port with nmap on the IPv6 Interface. 

nmap -e vlan0 -sV -p22 -6 fe80::9af2:b3ff:fefe:8880
Starting Nmap 7.91 ( https://nmap.org ) at 2021-04-18 14:43 PDT
Nmap scan report for fe80::9af2:b3ff:fefe:8880
Host is up (0.0018s latency).

PORT   STATE SERVICE VERSION
22/tcp open  ssh     Mocana NanoSSH 6.3 (protocol 2.0)

Service detection performed. Please report any incorrect results at https://nmap.org/submit/ .
Nmap done: 1 IP address (1 host up) scanned in 0.63 seconds


So how do we SSH using the IPv6 address?

From the mac
ssh vector@fe80::9af2:b3ff:fefe:8880%vlan0

vector@fe80::9af2:b3ff:fefe:8880's password:
HP J9727A 2920-24G-PoE+ Switch
Software revision WB.16.10.0010

That worked. Without IPv6 specific ACLs and with IPv6 autoconfig enabled, SSH is open to anyone that tries IPv6. However, if you noticed, the autoconfig address starts with fe80 which means it is link local so the attacker would have to be on the same Vlan as the interface.

What if I restrict management access to only subnet 10.10.100.0/24

So let's try it out. 
First I'll ssh to the IPv4 address to make sure that works:

ssh vector@10.10.10.254

vector@10.10.10.254's password:
HP J9727A 2920-24G-PoE+ Switch
Software revision WB.16.10.0010


That worked, so I will add an ip authorized-manager as 10.10.100.0/24 and try to ssh using the IPv4 address. Remember, our IPv4 address is 10.10.10.100, so it's not on the allow list.

HP-2920-24G-PoEP(config)# ip authorized-managers 10.10.100.0 255.255.255.0 access manager

from the MacBook
ssh vector@10.10.10.254
kex_exchange_identification: Connection closed by remote host


As you can see, ssh from the MacBook now fails.

But what if I try it from the IPv6 address?

ssh vector@fe80::9af2:b3ff:fefe:8880%vlan0
HP J9727A 2920-24G-PoE+ Switch
Software revision WB.16.10.0010

Your previous successful login (as manager) was on 2021-04-18 07:35:00
 from 10.10.10.100
There has been 1 unsuccessful login attempt since your previous login,
 most recently on 1990-01-01 07:36:16

Connection to fe80::9af2:b3ff:fefe:8880%vlan0 closed by remote host.
Connection to fe80::9af2:b3ff:fefe:8880%vlan0 closed.

Since IPv6 isn't disallowed we logged right in. You can see the failed attempt from 10.10.10.100 in the log.


Now how would you ssh to the MacBook from the Aruba 2930f?


If we look at "show management" again we see that Vlan 100 has IPv6 enabled and is set for autoconfig. So, just like on the MacBook, we use ssh <IPv6 Address> then append the Vlan id, %vlan100 in this case.

I didn't have an ssh server running on my MacBook so it didn't succeed but it tried.

  Interface Name  : Management          
  IPv6 Status     : Enabled 

  Address    |                                             Address    
  Origin     | IPv6 Address/Prefix Length                  Status     
  ---------- + ------------------------------------------- -----------
  autoconfig | fe80::9af2:b3ff:fefe:8880/64                preferred  


From the 2930f
ssh fe80::27:216d:4729:6c0d%vlan100
The SSH connection failed: Connection refused.


Looking at IPv6 routes

You still use the netstat -nr command. For IPv6 you scroll down past the IPv4 routes. I have a link in the reference section at the end of the blog that explains the flags. 

For our example, here is the IPv6 table:

netstat -nr
Routing tables

. 
. IPv4 detail removed for brevity
.

Internet6:
Destination                             Gateway                         Flags         Netif Expire
fe80::9af2:b3ff:fefe:8880%vlan0         98.f2.b3.fe.88.80               UHLWI         vlan0


Internet Connection Sharing

Sometimes you need to provide Internet access to a new network to complete your work. For example, recently I was installing a greenfield Ubiquiti network. It included a Cloud Key so it needed Internet access to register and be fully functional. Unfortunately, the Internet access hadn't been installed yet. 

I plugged in a second USB Ethernet adapter, connected wireless to my phone set to hotspot mode and used the "Sharing" System Preferences app to configure the sharing. 

  • Set "Share your connection from:" to wifi
  • Put put a check next to the USB Ethernet interface in "To computers using:"
  • Under "Service" put a check next to "Internet Sharing"    

Now connect the USB Ethernet to the device you need to share Internet with. I have found that it doesn't matter if the USB Ethernet is set to DHCP or manual. The device using the connection gets an address in the range 192.168.2.0/24


Combine Ethernet ports into a virtual port (LACP - Port Channel)

I haven't had a reason to bond two USB-C Ethernet adapters into an LACP bond for bandwidth on my laptop(!) but I have had a need to verify the configuration of a "Trunk" on an Aruba switch or a "Port-Channel" on a Cisco switch. 

It's very easy on Big Sur, again, just not so obvious. One caveat is that the bond has to use LACP. To get started:

In the network preferences app, click the funny little icon that looks like a circle with 3 dots in it:


Click on "Manage Virtual Interfaces..."


Click the "+" sign

Click on "New Link Aggregate..."


Enter a descriptive name for the bond and check the two USB Ethernet interfaces:


Click "Create"

You should see the new bond with the BSD Name "Bond0"


Click "Done"

You can now connect the Ethernet cables to the switch. As we found earlier, the Bond won't show "Connected" until it gets a DHCP assigned address or you manually assign a static IP address.

In this example, I set a static address since this Vlan didn't have a DHCP server. Here is what the interfaces look like in the terminal.


en0: flags=8863<UP,BROADCAST,SMART,RUNNING,SIMPLEX,MULTICAST> mtu 1500
	options=400<CHANNEL_IO>
	ether 50:ed:3c:22:be:32
	inet6 fe80::1465:e07c:8c73:4b87%en0 prefixlen 64 secured scopeid 0xa
	inet 192.168.10.143 netmask 0xffffff00 broadcast 192.168.10.255
	nd6 options=201<PERFORMNUD,DAD>
	media: autoselect
	status: active
en6: flags=8963<UP,BROADCAST,SMART,RUNNING,PROMISC,SIMPLEX,MULTICAST> mtu 1500
	options=6467<RXCSUM,TXCSUM,VLAN_MTU,TSO4,TSO6,CHANNEL_IO,PARTIAL_CSUM,ZEROINVERT_CSUM>
	ether 00:e0:4c:68:0a:0d
	nd6 options=201<PERFORMNUD,DAD>
	media: autoselect (1000baseT <full-duplex>)
	status: active
en9: flags=8963<UP,BROADCAST,SMART,RUNNING,PROMISC,SIMPLEX,MULTICAST> mtu 1500
	options=6467<RXCSUM,TXCSUM,VLAN_MTU,TSO4,TSO6,CHANNEL_IO,PARTIAL_CSUM,ZEROINVERT_CSUM>
	ether 00:e0:4c:68:0a:ab
	nd6 options=201<PERFORMNUD,DAD>
	media: autoselect (1000baseT <full-duplex>)
	status: active
bond0: flags=8943<UP,BROADCAST,RUNNING,PROMISC,SIMPLEX,MULTICAST> mtu 1500
	options=6067<RXCSUM,TXCSUM,VLAN_MTU,TSO4,TSO6,PARTIAL_CSUM,ZEROINVERT_CSUM>
	ether 00:e0:4c:68:0a:ab
	inet6 fe80::4b6:645c:b6da:611f%bond0 prefixlen 64 secured scopeid 0x19
	inet 10.112.254.20 netmask 0xffff0000 broadcast 10.112.254.255
	nd6 options=201<PERFORMNUD,DAD>
	media: autoselect (1000baseT <full-duplex>)
	status: active
	bond interfaces: en9 en6

I included en0, my wifi interface, for a reason. Look at the Ethernet address of en0. A "show lacp peer" lists en0's MAC as the "System ID" of the MacBook. I disabled wifi and disconnected/reconnected the Ethernet cables but the Aruba 5412r still showed the en0 MAC as the system ID.  


AHS-5412-MDF# sh lacp peer

LACP Peer Information.


System ID: 883a30-768a00


  Local  Local                          Port      Oper    LACP     Tx
  Port   Trunk  System ID         Port  Priority  Key     Mode     Timer
  ------ ------ ----------------- ----- --------- ------- -------- -----
  A8     Trk1   50ed3c-22be32     8     32768     1       Active   Slow
  B8     Trk1   50ed3c-22be32     22    32768     1       Active   Slow


But, doing a show mac-address trk1 lists the MAC addresses of interfaces en6/en9.


AHS-5412-MDF# sh mac-address trk1

 Status and Counters - Port Address Table - Trk1

  MAC Address       VLANs
  ----------------- ------------
  00e04c-680a0d     254
  00e04c-680aab     254


Here is the configuration of the trunk and Vlan 254 on the Aruba 5412r switch.

trunk A8,B8 trk1 lacp

show run vl 254

Running configuration:

Vlan 254
   name "Device Management"
   untagged Trk1
   ip address 10.112.254.254 255.255.255.0
   exit


I haven't covered installing the lldpd software yet, which will be in part 5, but here is what the lldp neighbor looks like on the MacBook:

[lldpcli] # sh ne
-------------------------------------------------------------------------------
LLDP neighbors:
-------------------------------------------------------------------------------
Interface:    en6, via: LLDP, RID: 4, Time: 0 day, 00:44:53
  Chassis:
    ChassisID:    mac 88:3a:30:76:8a:00
    SysName:      AHS-5412-MDF
    SysDescr:     HP J9851A Switch 5412Rzl2, revision KB.16.10.0012, ROM KB.16.01.0009 (/ws/swbuildm/rel_ajanta_qaoff/code/build/bom(swbuildm_rel_ajanta_qaoff_rel_ajanta))
    MgmtIP:       10.112.254.254
    Capability:   Bridge, on
    Capability:   Router, on
  Port:
    PortID:       local 8
    PortDescr:    A8
    TTL:          120
  Unknown TLVs:
    TLV:          OUI: 00,16,B9, SubType: 2, Len: 2 00,01
-------------------------------------------------------------------------------
Interface:    en9, via: LLDP, RID: 4, Time: 0 day, 00:45:00
  Chassis:
    ChassisID:    mac 88:3a:30:76:8a:00
    SysName:      AHS-5412-MDF
    SysDescr:     HP J9851A Switch 5412Rzl2, revision KB.16.10.0012, ROM KB.16.01.0009 (/ws/swbuildm/rel_ajanta_qaoff/code/build/bom(swbuildm_rel_ajanta_qaoff_rel_ajanta))
    MgmtIP:       10.112.254.254
    Capability:   Bridge, on
    Capability:   Router, on
  Port:
    PortID:       local 40
    PortDescr:    B8
    TTL:          120
  Unknown TLVs:
    TLV:          OUI: 00,16,B9, SubType: 2, Len: 2 00,01
-------------------------------------------------------------------------------
[lldpcli] #


As expected, it shows both interfaces, A8/B8, on the 5412. 


Finally, to show that it worked here is a ping to an access point connected to another switch:

ping 10.112.254.155
PING 10.112.254.155 (10.112.254.155): 56 data bytes
64 bytes from 10.112.254.155: icmp_seq=0 ttl=64 time=5.203 ms
64 bytes from 10.112.254.155: icmp_seq=1 ttl=64 time=1.693 ms
64 bytes from 10.112.254.155: icmp_seq=2 ttl=64 time=1.613 ms
64 bytes from 10.112.254.155: icmp_seq=3 ttl=64 time=1.752 ms
^C
--- 10.112.254.155 ping statistics ---
4 packets transmitted, 4 packets received, 0.0% packet loss
round-trip min/avg/max/stddev = 1.613/2.565/5.203/1.524 ms


Wireshark

I opened Wireshark and Bond0 appeared in the capture interface dialog. While capturing, this was the title:


Listing everything about the Network!

macOS includes a utility called "networksetup". It has over 100 options! I can't cover all of them here. To see a complete list:

  • Open a terminal
  • enter networksetup 1

The 1 is an invalid option and networksetup will dump every option out as a list. You can also enter networksetup with no options and it will dump a help screen.


Getting Started with networksetup

List all network hardware:

networksetup -listallhardwareports


networksetup -listallhardwareports                                                                                                                     [22:11:57]

Hardware Port: Ethernet Adaptor (en3)
Device: en3
Ethernet Address: 1e:00:f2:0a:c4:65

Hardware Port: Ethernet Adaptor (en4)
Device: en4
Ethernet Address: 1e:00:f2:0a:c4:66

Hardware Port: Wi-Fi
Device: en0
Ethernet Address: 50:ed:3c:22:be:32

Hardware Port: Bluetooth PAN
Device: en13
Ethernet Address: 50:ed:3c:2c:91:ac

Hardware Port: Thunderbolt 1
Device: en1
Ethernet Address: 36:5f:f4:a6:93:80

Hardware Port: Thunderbolt 2
Device: en2
Ethernet Address: 36:5f:f4:a6:93:84

Hardware Port: Thunderbolt Bridge
Device: bridge0
Ethernet Address: 36:5f:f4:a6:93:80

VLAN Configurations
===================

VLAN User Defined Name: VLAN-254
Parent Device: en9
Device ("Hardware" Port): vlan0
Tag: 254


You can use the 

networksetup -listallnetworkservices

command to list all network services on your Mac. On my M1 I have connected several different USB Ethernet adapters over time and created a Vlan interface. Here are what my services look like:

networksetup -listallnetworkservices
An asterisk (*) denotes that a network service is disabled.
Wi-Fi
iPhone USB
USB 10/100/1000 LAN 3
USB 10/100/1000 LAN
StarTech USBA2DPGB
USB 10/100/1000 LAN 2
Bluetooth PAN 2
Thunderbolt Ethernet Slot 1
Thunderbolt Bridge
VLAN-254
VPN (L2TP)


Now that you have a list of services, you can get information about them. In this case, my current wifi settings:

networksetup -getinfo Wi-Fi                                                                                                           [18:16:18]
DHCP Configuration
IP address: 10.0.23.119
Subnet mask: 255.255.252.0
Router: 10.0.20.1
Client ID:
IPv6 IP address: none
IPv6 Router: none
Wi-Fi ID: 50:ed:3c:22:be:32


List all the SSIDs that you have connected to:

networksetup -listpreferredwirelessnetworks en0


networksetup -listpreferredwirelessnetworks en0                                                                                                        [22:18:52]
Preferred networks on en0:
	The Paddock
	JCI_Guest WIFI
	Troys iPhone
	VOE2
	LAE GUEST
	CHE Guest
	VectorUSA Guest
	MPH Guest
	888-Secure
	888-Guest
	PD-Guest
	AirConsole-28
	AirConsole-D8
	Piconsole-02
	Employee
	RIV-guest


List Vlans that have been created:

networksetup -listVLANs

In this example, I have created vlan 254 using USB adapter en9

networksetup -listVLANs                                                                                                                                [21:33:59]

VLAN User Defined Name: VLAN-254
Parent Device: en9
Device ("Hardware" Port): vlan0
Tag: 254


The Airport Utility

One thing that every network engineer needs, especially a wireless network engineer, is information about the current Wi-Fi connection and the SSIDs in the area. macOS makes it easy to get this information.

You can hold down the ⌥ key and click on the Wi-Fi icon in the menu bar to get details on the current Wi-Fi connection. This brings up additional information compared to just clicking on the Wi-Fi icon. I don't know why Apple doesn't make this the default. Anyway, here is what the additional menu looks like:


From the terminal

Apple includes a utility called "airport" that lists information about the current Wi-Fi connection and other SSIDs in the area. 

But, Apple hid it deep in the operating system. To make it easy to use, create a symbolic link using the following command in the terminal:

sudo ln -s /System/Library/PrivateFrameworks/Apple80211.framework/Versions/Current/Resources/airport /usr/local/bin/airport


Now you can type "airport" from any directory and the command will work.

Display Wi-Fi information

airport -I                                                                                                                                             [21:35:56]
     agrCtlRSSI: -52
     agrExtRSSI: 0
    agrCtlNoise: -90
    agrExtNoise: 0
          state: running
        op mode: station
     lastTxRate: 864
        maxRate: 144
lastAssocStatus: 0
    802.11 auth: open
      link auth: wpa2-psk
          BSSID: 9c:8c:d8:11:7a:f0
           SSID: test
            MCS: 0
        channel: 36,80


Scan the Wi-Fi environment

airport -s                                                                                                                                             [21:50:24]
                            SSID BSSID             RSSI CHANNEL HT CC SECURITY (auth/unicast/group)
                       LinksysJT d8:eb:97:33:01:a8 -96  6       Y  US WPA2(PSK/AES/AES)
                          ORBI72 c2:a5:11:ac:c0:22 -94  8       Y  -- WPA2(PSK/AES/AES)
                 LinksysJT_guest da:eb:97:33:01:a8 -94  6       Y  US WPA2(PSK/AES/AES)
             MySpectrumWiFic0-2G a4:08:f5:45:f3:c6 -93  1       Y  US WPA2(PSK/AES/AES)
                        jayzee59 c0:3c:04:a9:89:49 -92  1       Y  US WPA2(PSK/AES/AES)
                        V Family 92:3b:ad:af:a8:87 -83  11      Y  -- WPA2(PSK/AES/AES)
                            test 38:17:c3:12:0c:30 -78  52      Y  -- WPA2(PSK/AES/AES)
                            test 38:17:c3:12:0c:20 -71  11      Y  -- WPA2(PSK/AES/AES)
                       NETGEAR23 6c:cd:d6:be:e3:53 -71  4       Y  US WPA2(PSK/AES/AES)
  HP-Print-F8-Officejet Pro 8600 10:1f:74:63:41:f8 -66  1       N  -- NONE
                            test 9c:8c:d8:11:7a:e0 -45  1       Y  -- WPA2(PSK/AES/AES)
                            test 9c:8c:d8:11:7a:f0 -50  36      Y  US WPA2(PSK/AES/AES)


Scan a specific SSID

You can include an SSID after the -s to get information on only that SSID:

airport -s test                                                                                                                                        
                            SSID BSSID             RSSI CHANNEL HT CC SECURITY (auth/unicast/group)
                            test 38:17:c3:12:0c:30 -76  52      Y  -- WPA2(PSK/AES/AES)
                            test 38:17:c3:12:0c:20 -67  11      Y  -- WPA2(PSK/AES/AES)
                            test 9c:8c:d8:11:7a:e0 -46  1       Y  -- WPA2(PSK/AES/AES)
                            test 9c:8c:d8:11:7a:f0 -50  36      Y  US WPA2(PSK/AES/AES)


This example is my lab. You can see that I have two APs, both of which have a 2.4Ghz and 5Ghz radio.


That does it for Part 4. Be sure to check back soon for Part 5!


References