Parts 2 -5 are now published. You can find them
- Apple MacBook Air M1 for Network Engineers Part 2
- Apple MacBook Air M1 for Network Engineers Part 3
- Apple MacBook Air M1 for Network Engineers Part 4
- Apple MacBook Air M1 for Network Engineers Part 5
I haven't used a Mac as a daily driver for a few years. I switched over to Ubuntu when I started working on my python, Git, and dev skills for the Cisco Devnet program. Ubuntu is a great platform for dev work because there are so many free, open-source tools and it will run on almost any hardware from a Raspberry Pi to a maxed-out desktop.
But I had to have a new Mac once the ARM-based Apple Silicon Macs were announced! Battery life was the biggest factor but I also wanted the instant-on, iPad-like performance of the Apple Silicon. It makes me smile every time I open the lid and it is just ready to go. Add in Touch-ID, Retina display, and the Big Sur version of macOS and it made the money jump right out of my wallet!
I hadn't used Big Sur since my current MacBook is a 2012 MacBook Pro, so I had some research to do. Luckily there are plenty of YouTube videos with tips on setting up the new M1 Macs and on the new features of Big Sur.
Some videos to get you started:
- 25 macOS Tips and Tricks you need to know!
- Hidden macOS Finder Tips you probably don't know
- 15 Obscure System Preferences You Should Know About
- Mac Basics: Customizing Toolbars
- Complex File Searches Using the macOS Finder
- How To Switch Between Mac Apps, Desktops, Windows, and Tabs
- 10 Mac Features That Will Save You Time
- Mac Basics: Customizing Toolbars
Some useful webpages
Choose an app to open a file on Mac
Change Finder preferences on Mac
Padbury Clock Screen Saver
Moom - Move/Zoom windows
I also used a few podcasts:
- Mac Geek Gab
- Mac Power Users
- Automators
to get up to speed.
They are two different kinds of podcasts. Mac Geek Gab focuses on "Cool Stuff Found" which is hardware/software that works with the Mac and "Quick Tips" which are tips on using IOS and macOS.
Mac Power Users is a podcast on getting maximum productivity out of macOS. I don't use most of the software that they recommend. Most of the software is subscription-based and it gets out of control fast. But, they offer a lot of productivity tips for macOS itself and I find the podcast worth my time to listen to.
One quick tip for wireless:
Hold down the option key while clicking on the wifi icon to get additional information on the connection. It's great to be able to see the channel, MCS, RSSI, Noise Floor, transmit rate, and Phy Mode instantly.

One quick tip for Bluetooth:
If you are having trouble with Bluetooth devices you can try resetting the Bluetooth module. Simply press the Shift + Option keys, then click on the Bluetooth icon in the menu bar. You will see an option to "Reset the Bluetooth module". Click on it and the Bluetooth will be reset.
You won't have to re-pair the devices, this just resets the Bluetooth module.

TIP: If you need to save a file to a system location such as an nmap script to "/usr/loca/share/nmap/scripts", you can press shift+cmd+g" to open a "go to folder" dialog. Type the path into the dialog. Tab completion is supported.

Initial Setup
Apple has a startup script that did a good job of getting me logged in and working. But I learned a lot from the videos and podcasts so I did some customizing.
Preferences
If you are moving from Windows or Linux, macOS has some defaults that you will probably want to change. The first thing I did was use the System Preferences app to fix them. On macOS, you move the mouse to the top left of the screen and click on the Apple icon to open system preferences.
Change the view to Organize alphabetically
On the View menu, select "Organize Alphabetically" instead of the default "Organize by Categories".
Now preferences will look like this:

You can also hide any icons that you are sure you won't need. On the View menu, click Customize. Checkmarks will appear on each icon. Uncheck any that you don't want to see.
General Category
Show scroll bars:
Always
This turns the scroll bars on all the time. The default is to hide them until you click into a window in Finder. I find that very annoying.
Apple ID
iCloud Drive, options - turn off Desktop & Documents
If you don't do this and you are on-site with no Internet service your files will not be available

Security & Privacy
General
- Click the lock in the lower left and enter your password.
- Put a check in the box next to "Show a message when the screen is locked.
- Click on the drop-down "Set Lock Message..."

- Enter your message and click OK.
- Click the lock again to lock the General settings


Firewall
By default the firewall is disabled. You should enable it.
Firewall
Click - Turn On Firewall

Trackpad
Point & Click
- A lot of Mac users check the "Tap to Click" option. I tried it and didn't like it. You should give it a shot, maybe it will work for you.
- Click - Set to Firm

More Gestures
Click the More Gestures tab and enable App Expose. I used the Swipe down with four fingers gesture.
App Expose is used to show all windows of an application on the screen.


Display

Desktop
Apple, Colors
I'm going for maximum battery life and minimum distraction so I set the desktop to solid black. One interesting side effect is that I use a DisplayLink monitor in the field. While setting it up I thought it wasn't working. After some time troubleshooting, I realized that with no apps moved to it I was looking at the black desktop and it was working! Just a heads up.

Screen Savers - set up Hot Corners
If you hold down the Option key while selecting a corner in Preferences then the corner isn't active unless you also hold down the Option key. I use the Apple icon a lot and this prevents me from showing the desktop when I meant to show the icon.
Top Left - Option+Desktop
Bottom Left - Mission Control
Top Right - Notification Center
Bottom Right - Launchpad

Accessibility

Dock and Menu Bar


Dock
Apple includes a lot of apps on the dock. I find that I don't use many of the built-in apps so I removed the ones I don't expect to use. To do that:
Right-click, select Options, Remove from Dock.
View menu
Switch to the Finder app. In the Menu Bar, click on View
Put a check in use stacks. This organizes the files on the desktop into neat folders. You can uncheck to quickly go back to showing individual files.
Click on Show Path bar, and show status bar
Customize the toolbar
While in the view menu, click on Customize Toolbars...
I added "Get Info" to the bar and changed "Show" to text and Icon.
Finder
With Finder as the active app, click Finder, Preferences in the menu bar. Click the Advanced tab and put a check in "Show all file extensions in Finder". This prevents a malicious file from hiding its true extension.
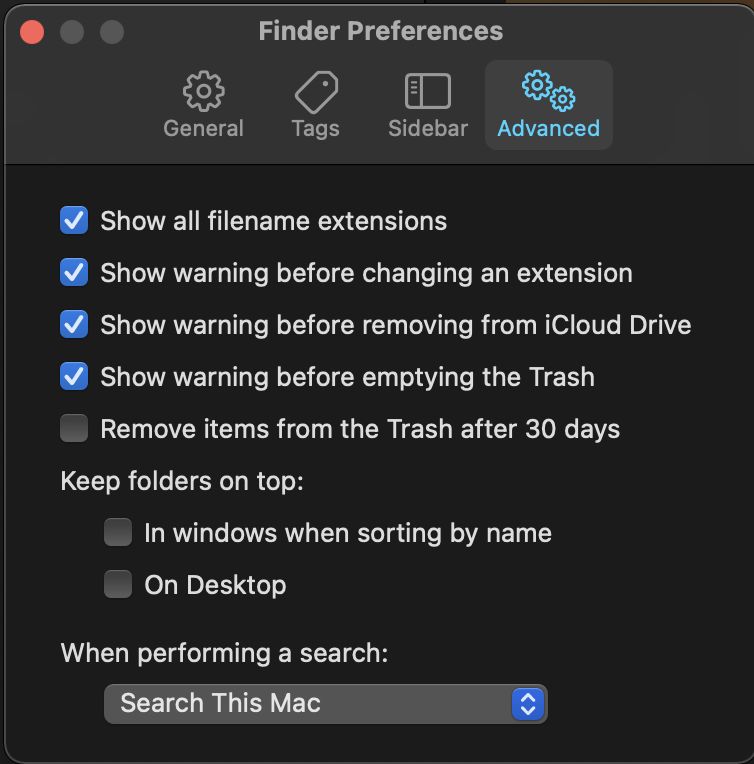
One tip for Finder. In the Toolbar, there is a Group tool. If you have mixed file types in a folder it's very convenient to group by Application.

Tips on sorting in Finder
Safari
Keyboard shortcuts and gestures in Safari on Mac
Open Safari Preferences
General
Uncheck Open "Safe" files after downloading. This a personal OpSec issue. I don't like for files that I download from the Internet to be opened automatically.
New windows open with: Empty Page - I don't like to wait for a new window to load a page that I probably won't be using.
New tabs open with: Empty Page

Advanced
- Put a check in Show Develop menu in the menu bar.
- Put a check in Show Full Website Address

Extensions
I haven't used Safari as my daily driver before but I'm going to give it a go on the M1 since it's highly optimized for ARM and should give me the best battery life. I can see that I will have to give up some extensions that I am used to on Firefox like vertical tabs, UBlock Origin, Ghostery, etc. but if I get 12 hours of battery life it's a good trade-off.
To install extensions, click Safari in the menu bar, then Safari extensions... to locate extensions for Safari. Similar to Chrome, Firefox, and Edge, Safari extensions are now in the App Store.
Grammarly
This is a grammar-checking extension. There are versions for Chrome, Firefox, Safari. You will have to create a free account and login to start using Grammarly. I highly recommend it. If you pay for a subscription you can run Grammarly in Microsoft apps.
LastPass
Open Safari and click the link below to go to the Logmein download site.
How do I install the Safari app extension on my mac
- Download the lastpass.dmg file.
- Double click on the dmg, when it opens, drag it into the applications folder.
- Double click to start it and log in.
- Back in Safari.
- Preferences, Extensions, enable the lastpass extension.
Buffer
This is an extension that lets you tweet from Safari. I find it handy when I find an info sec site that I want to share.
Open the App Store, click on Catagories, Safari Extensions. In the search bar enter buffer. You will see Buffer: Social Media Composer.
Click on Get, Install.
Activity monitor
Add a column for architecture. This lets you see which apps are running native and which are still Intel.

Time Machine
macOS includes a decent backup application called Time Machine. Since network engineers tend to install a lot of software from Github and other Internet locations, having a full backup is important. There are 3rd party tools like Carbon Copy Cloner and SuperDuper that have a lot more features. At the time of this blog (4-15-2021) SuperDuper hadn't been updated to work with the M1.
I downloaded the Carbon Copy Cloner trial and it worked with the M1. The Caveat is that it can't make a bootable back. The work around is to install Big Sur manually and then restore. I think for the short term I'm going to stick with Time Machine. The snap shot feature of Carbon Copy Cloner shoulds good but I'm not sure I need it.
At a minimum, you should get Time Machine setup.
Also, I still use a Windows laptop when I'm at the office. If it got crypto locked all of my Dropbox and Goggle Drive files would get overwritten with encrypted versions. Having an offline backup is a necessity if you interact with Windows.
I bought a Elecife M.2 NVME PCIe SATA NGFF SSD Enclosure and a Western Digital 1TB WD Blue SN550 NVMe drive to hold the backups. The enclosure is very nice, tool-free, and lightweight. Not like the old days of using a 2.5" spinning hard drive in an external enclosure.
As soon as I connected it, Time Machine opened and asked if I wanted to use it. After that, it does a backup every hour and saves weekly and monthly backups. I don't carry the drive with me so I don't do the hourly. I usually just connected it in the evening and let it do one or two backups.
The NVME is so fast that the backups only take a few minutes.
I noticed that my .zshrc file wasn't visible in the backup. Use "shift+cmd+." to show hidden files.
Reference
Back up your Mac with Time Machine
Wrap Up
That does it for the basic setup of the OS. In the next post, I will dive into installing the tools a network engineer needs.

Hi Michael,
ReplyDeleteThank you for taking all the time to write this review and this is an excellent post that helps me decide if I want a mac as daily driver or not. May I know which specification of macbook air did you for?
I've always been a Windows user, but after reading this, I'm really intrigued by the performance of the Apple Macbook Laptop. The fact that it's power-efficient and still packs a punch for network-related work is impressive. Do you think it's worth switching platforms?
ReplyDeleteI've been a loyal Windows user for a long time, but after coming across this information, I'm genuinely fascinated by the performance of the Apple MacBook laptop. Beatriz Barata
ReplyDeleteI gained a lot of knowledge about the features and advantages of the most recent Apple MacBook from the author of this blog, who took the time to write a fantastic blog post about the product. I had no idea about the advantages of the MacBook until I read this blog. It was by accident that I came across this blog when searching for Lenovo Chromebooks.
ReplyDeleteThis post explains the topic clearly and professionally, and choosing Macbook Rental Dubai is definitely a smart option for businesses that want performance, flexibility, and better budget control.
ReplyDeleteGreat insights on the MacBook Air M1 for networking tasks! It’s impressive how capable these machines are even for specialized workflows. For anyone who needs access to a powerful Mac temporarily — for testing, events, or project work — MacBook Rental can be a smart, cost-effective solution. Thanks for sharing!
ReplyDeleteGreat insights on using the Apple Macbook Air M1 for network engineers. This Apple MacBook really stands out with its battery life, instant performance, and macOS productivity tips.
ReplyDeleteVery informative post explaining the benefits of renting devices for short-term needs. Choosing Macbook Rental Dubai in the middle of projects or events helps businesses stay productive, save costs, and access reliable performance without long-term commitments.
ReplyDeleteGreat post highlighting the Apple MacBook Air M1 and its performance for network and professional use. For businesses needing reliable devices without long-term investment, Macbook Rental Dubai provides a flexible and convenient solution.
ReplyDeleteA Dual Monitor Extender for Laptop is an excellent tool for enhancing workflow and efficiency. By adding two additional screens to your laptop.
ReplyDeleteSell Macbook Air For Cash with confidence through TheTechBuyers and receive a competitive offer, fast payment, and a simple, secure selling experience.
ReplyDeleteExcellent review of the Apple MacBook Air M1 and its capabilities for networking and professional tasks. Apple's performance and efficiency continue to impress users, and macbook Rental is a practical solution for businesses and individuals who need premium Mac devices for short-term projects or events.
ReplyDelete