If you have been following along with parts 1-3, you now have macOS tuned up and some basic applications installed. If you need to review previous blogs in this series:
- Apple MacBook Air M1 for Network Engineers Part 5
- Apple MacBook Air M1 for Network Engineers Part 3
- Apple MacBook Air M1 for Network Engineers Part 2
- Apple MacBook Air M1 for Network Engineers Part 1
In part 4 we will:
- Connect and configure USB Ethernet adapters
- Add a second subnet to the adapter
- Configure vlan tagging
- Take a quick look at IPv6
- Enable Internet Connection Sharing
- Create an LACP bond
- Listing everything about the Network
- The Airport utility - List wireless information
In part 5 we will start installing terminal and networking applications like arp-scan, lldpd, cdpr, etc.
Using USB Ethernet Adapters
Big Sur makes it easy to configure USB Ethernet adapters using the Network Preferences app. Being a network engineer it's common for me to use two different USB Ethernet adapters at the same time.
- Connect one of the adapters
- Open Network Preferences
- Click the + sign on the bottom left of the panel
- The new service dialog will open
- Click the drop-down beside "Interface:" and select the adapter
- You can give it a descriptive name or just click "create"

- Repeat if you need a second adapter.
- Connect Ethernet cables to the adapter and switch.
If both networks have DHCP running the interfaces will just come up.
If there is no DHCP server available, the interfaces will show "Not Connected". That took a little getting used to since normally you think having a link will make the interface go into connected status.
Note: if you change an adapter from DHCP to Manual or Manual to DHCP you have to click Apply before the change goes into effect.

Notice that the second USB Ethernet adapter has a "2" appended to it. In this example, both adapters are identical Satechi USB-C adapters with 3 USB-A ports.
Adding a route
If you need to reach additional networks connected to one of the adapters you will probably need to add a route. It's easy to add a route on MacOS.
Let's say one of our adapters is connected to a surveillance network 10.29.1.0/24 with a gateway of .253. But there is another network 10.29.2.0/24 that you also need to access. You just need to add a route to 10.29.2.0/24.
Open Terminal
Type:
sudo route add 10.29.2.0/24 10.29.1.253
To display the routing table
netstat -nr
Routing tables

Internet:
Destination        Gateway            Flags        Netif Expire
default            192.168.10.254     UGSc           en0
default            10.29.1.253        UGScI          en9
10.29.1/24         link#22            UCS            en9      !
10.29.1.100/32     link#22            UCS            en9      !
10.29.1.253/32     link#22            UCS            en9      !
10.29.1.253        link#22            UHLWIir        en9      !
10.29.2/24         10.29.1.253        UGSc           en9
127                127.0.0.1          UCS            lo0
127.0.0.1          127.0.0.1          UH             lo0
To remove the route
sudo route delete 10.29.2.0/24 10.29.1.253
Note: The route won't be persistent. When you reboot it will be gone.
Add a second IP Subnet to a USB Ethernet adapter
- Open the Network Preferences app
- Click the "+" sign on the bottom left to add a new service
- Next to "Interface:" pick the USB Ethernet adapter
- Next to "Service Name:" enter a descriptive name.
- Click Create


en9: flags=8963<UP,BROADCAST,SMART,RUNNING,PROMISC,SIMPLEX,MULTICAST> mtu 1500
	options=6467<RXCSUM,TXCSUM,VLAN_MTU,TSO4,TSO6,CHANNEL_IO,PARTIAL_CSUM,ZEROINVERT_CSUM>
	ether 00:e0:4c:68:0a:ab
	inet6 fe80::d6:bc89:db67:96ee%en9 prefixlen 64 secured scopeid 0x16
	inet 10.253.7.100 netmask 0xfffffc00 broadcast 10.253.7.255
	inet 10.10.10.100 netmask 0xffffff00 broadcast 10.10.10.255
	nd6 options=201<PERFORMNUD,DAD>
	media: autoselect (1000baseT <full-duplex>)
	status: active
Adding Vlan tagging

- Click on "Manage Virtual Interfaces..."

- Click the "+" sign
- Click on "New Vlan..."

- Next to "Vlan Name:" enter a descriptive name
- Next to "Tag:" enter 100
- Make sure "Interface:" is the USB 10/100/100 LAN
- Click Create


vlan0: flags=8843<UP,BROADCAST,RUNNING,SIMPLEX,MULTICAST> mtu 1500
	options=6063<RXCSUM,TXCSUM,TSO4,TSO6,PARTIAL_CSUM,ZEROINVERT_CSUM>
	ether 00:e0:4c:68:0a:ab
	inet6 fe80::27:216d:4729:6c0d%vlan0 prefixlen 64 secured scopeid 0x18
	inet 10.10.10.100 netmask 0xffffff00 broadcast 10.10.10.255
	nd6 options=201<PERFORMNUD,DAD>
	vlan: 100 parent interface: en9
	media: autoselect (1000baseT <full-duplex>)
	status: active
interface 1
   name "Uplink"
   tagged vlan 86,100
   exit
vlan 100
   name "Management"
   tagged 1
   untagged 3-24
   ip address 10.10.10.254 255.255.255.0
   exit
ping 10.10.10.254
PING 10.10.10.254 (10.10.10.254): 56 data bytes
64 bytes from 10.10.10.254: icmp_seq=0 ttl=255 time=2.447 ms
64 bytes from 10.10.10.254: icmp_seq=1 ttl=255 time=1.624 ms
^C
--- 10.10.10.254 ping statistics ---
2 packets transmitted, 2 packets received, 0.0% packet loss
round-trip min/avg/max/stddev = 1.624/2.035/2.447/0.412 ms
Using Wireshark to verify the Vlan tagging

Ethernet II, Src: HewlettP_fe:88:80 (98:f2:b3:fe:88:80), Dst: RealtekS_68:0a:ab (00:e0:4c:68:0a:ab)
    Destination: RealtekS_68:0a:ab (00:e0:4c:68:0a:ab)
        Address: RealtekS_68:0a:ab (00:e0:4c:68:0a:ab)
        .... ..0. .... .... .... .... = LG bit: Globally unique address (factory default)
        .... ...0 .... .... .... .... = IG bit: Individual address (unicast)
    Source: HewlettP_fe:88:80 (98:f2:b3:fe:88:80)
        Address: HewlettP_fe:88:80 (98:f2:b3:fe:88:80)
        .... ..0. .... .... .... .... = LG bit: Globally unique address (factory default)
        .... ...0 .... .... .... .... = IG bit: Individual address (unicast)
    Type: 802.1Q Virtual LAN (0x8100)
802.1Q Virtual LAN, PRI: 0, DEI: 0, ID: 100
    000. .... .... .... = Priority: Best Effort (default) (0)
    ...0 .... .... .... = DEI: Ineligible
    .... 0000 0110 0100 = ID: 100
    Type: IPv4 (0x0800)
A word about IPv6
inet6 fe80::27:216d:4729:6c0d%vlan0 prefixlen 64 secured scopeid 0x18
ping6 -I vlan0 fe80::27:216d:4729:6c0d
PING6(56=40+8+8 bytes) fe80::27:216d:4729:6c0d%vlan0 --> fe80::27:216d:4729:6c0d
16 bytes from fe80::27:216d:4729:6c0d%vlan0, icmp_seq=0 hlim=64 time=0.158 ms
16 bytes from fe80::27:216d:4729:6c0d%vlan0, icmp_seq=1 hlim=64 time=0.262 ms
16 bytes from fe80::27:216d:4729:6c0d%vlan0, icmp_seq=2 hlim=64 time=0.228 ms
16 bytes from fe80::27:216d:4729:6c0d%vlan0, icmp_seq=3 hlim=64 time=0.340 ms
Address    |                                             Address
  Origin     | IPv6 Address/Prefix Length                  Status
  ---------- + ------------------------------------------- -----------
  autoconfig | fe80::9af2:b3ff:fefe:8880/64                preferred
ping6 -I vlan0 fe80::9af2:b3ff:fefe:8880
PING6(56=40+8+8 bytes) fe80::27:216d:4729:6c0d%vlan0 --> fe80::9af2:b3ff:fefe:8880
16 bytes from fe80::9af2:b3ff:fefe:8880%vlan0, icmp_seq=0 hlim=64 time=3.237 ms
16 bytes from fe80::9af2:b3ff:fefe:8880%vlan0, icmp_seq=1 hlim=64 time=1.498 ms
16 bytes from fe80::9af2:b3ff:fefe:8880%vlan0, icmp_seq=2 hlim=64 time=1.853 ms
16 bytes from fe80::9af2:b3ff:fefe:8880%vlan0, icmp_seq=3 hlim=64 time=1.865 ms
16 bytes from fe80::9af2:b3ff:fefe:8880%vlan0, icmp_seq=4 hlim=64 time=1.374 ms
^C
--- fe80::9af2:b3ff:fefe:8880 ping6 statistics ---
5 packets transmitted, 5 packets received, 0.0% packet loss
round-trip min/avg/max/std-dev = 1.374/1.965/3.237/0.665 ms
ping6 fe80::9af2:b3ff:fefe:8880%vlan0
PING6(56=40+8+8 bytes) fe80::27:216d:4729:6c0d%vlan0 --> fe80::9af2:b3ff:fefe:8880%vlan0
16 bytes from fe80::9af2:b3ff:fefe:8880%vlan0, icmp_seq=0 hlim=64 time=1.365 ms
16 bytes from fe80::9af2:b3ff:fefe:8880%vlan0, icmp_seq=1 hlim=64 time=0.815 ms
16 bytes from fe80::9af2:b3ff:fefe:8880%vlan0, icmp_seq=2 hlim=64 time=0.848 ms
16 bytes from fe80::9af2:b3ff:fefe:8880%vlan0, icmp_seq=3 hlim=64 time=0.724 ms
16 bytes from fe80::9af2:b3ff:fefe:8880%vlan0, icmp_seq=4 hlim=64 time=0.771 ms
^C
--- fe80::9af2:b3ff:fefe:8880%vlan0 ping6 statistics ---
5 packets transmitted, 5 packets received, 0.0% packet loss
round-trip min/avg/max/std-dev = 0.724/0.905/1.365/0.234 ms
nmap -e vlan0 -sV -p22 -6 fe80::9af2:b3ff:fefe:8880
Starting Nmap 7.91 ( https://nmap.org ) at 2021-04-18 14:43 PDT
Nmap scan report for fe80::9af2:b3ff:fefe:8880
Host is up (0.0018s latency).

PORT   STATE SERVICE VERSION
22/tcp open  ssh     Mocana NanoSSH 6.3 (protocol 2.0)

Service detection performed. Please report any incorrect results at https://nmap.org/submit/ .
Nmap done: 1 IP address (1 host up) scanned in 0.63 seconds
From the mac
ssh vector@fe80::9af2:b3ff:fefe:8880%vlan0

vector@fe80::9af2:b3ff:fefe:8880's password:
HP J9727A 2920-24G-PoE+ Switch
Software revision WB.16.10.0010
What if I restrict management access to only subnet 10.10.100.0/24
ssh vector@10.10.10.254

vector@10.10.10.254's password:
HP J9727A 2920-24G-PoE+ Switch
Software revision WB.16.10.0010
HP-2920-24G-PoEP(config)# ip authorized-managers 10.10.100.0 255.255.255.0 access manager

from the MacBook
ssh vector@10.10.10.254
kex_exchange_identification: Connection closed by remote host
ssh vector@fe80::9af2:b3ff:fefe:8880%vlan0
HP J9727A 2920-24G-PoE+ Switch
Software revision WB.16.10.0010

Your previous successful login (as manager) was on 2021-04-18 07:35:00
 from 10.10.10.100
There has been 1 unsuccessful login attempt since your previous login,
 most recently on 1990-01-01 07:36:16

Connection to fe80::9af2:b3ff:fefe:8880%vlan0 closed by remote host.
Connection to fe80::9af2:b3ff:fefe:8880%vlan0 closed.
Now how would you ssh to the MacBook from the Aruba 2930f?
  Interface Name  : Management
  IPv6 Status     : Enabled

  Address    |                                             Address
  Origin     | IPv6 Address/Prefix Length                  Status
  ---------- + ------------------------------------------- -----------
  autoconfig | fe80::9af2:b3ff:fefe:8880/64                preferred


From the 2930f
ssh fe80::27:216d:4729:6c0d%vlan100
The SSH connection failed: Connection refused.
Looking at IPv6 routes
netstat -nr
Routing tables

.
. IPv4 detail removed for brevity
.

Internet6:
Destination                             Gateway                         Flags         Netif Expire
fe80::9af2:b3ff:fefe:8880%vlan0         98.f2.b3.fe.88.80               UHLWI         vlan0
Internet Connection Sharing
Sometimes you need to provide Internet access to a new network to complete your work. For example, recently I was installing a greenfield Ubiquiti network. It included a Cloud Key so it needed Internet access to register and be fully functional. Unfortunately, the Internet access hadn't been installed yet.
I plugged in a second USB Ethernet adapter, connected wireless to my phone set to hotspot mode and used the "Sharing" System Preferences app to configure the sharing.
- Set "Share your connection from:" to wifi
- Put put a check next to the USB Ethernet interface in "To computers using:"
- Under "Service" put a check next to "Internet Sharing"
Now connect the USB Ethernet to the device you need to share Internet with. I have found that it doesn't matter if the USB Ethernet is set to DHCP or manual. The device using the connection gets an address in the range 192.168.2.0/24

Combine Ethernet ports into a virtual port (LACP - Port Channel)
I haven't had a reason to bond two USB-C Ethernet adapters into an LACP bond for bandwidth on my laptop(!) but I have had a need to verify the configuration of a "Trunk" on an Aruba switch or a "Port-Channel" on a Cisco switch.
It's very easy on Big Sur, again, just not so obvious. One caveat is that the bond has to use LACP. To get started:
In the network preferences app, click the funny little icon that looks like a circle with 3 dots in it:

Click on "Manage Virtual Interfaces..."

Click the "+" sign
Click on "New Link Aggregate..."
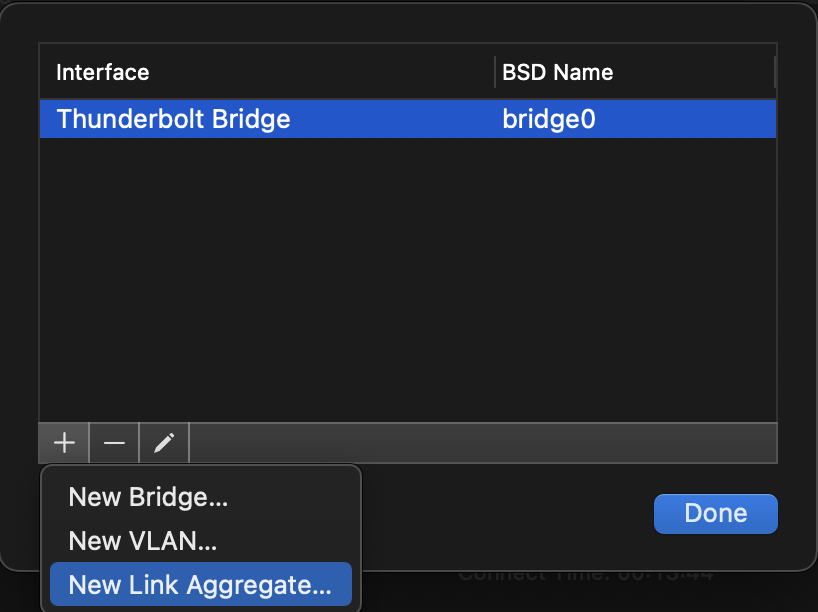

Click "Create"
You should see the new bond with the BSD Name "Bond0"

You can now connect the Ethernet cables to the switch. As we found earlier, the Bond won't show "Connected" until it gets a DHCP assigned address or you manually assign a static IP address.

en0: flags=8863<UP,BROADCAST,SMART,RUNNING,SIMPLEX,MULTICAST> mtu 1500
	options=400<CHANNEL_IO>
	ether 50:ed:3c:22:be:32
	inet6 fe80::1465:e07c:8c73:4b87%en0 prefixlen 64 secured scopeid 0xa
	inet 192.168.10.143 netmask 0xffffff00 broadcast 192.168.10.255
	nd6 options=201<PERFORMNUD,DAD>
	media: autoselect
	status: active
en6: flags=8963<UP,BROADCAST,SMART,RUNNING,PROMISC,SIMPLEX,MULTICAST> mtu 1500
	options=6467<RXCSUM,TXCSUM,VLAN_MTU,TSO4,TSO6,CHANNEL_IO,PARTIAL_CSUM,ZEROINVERT_CSUM>
	ether 00:e0:4c:68:0a:0d
	nd6 options=201<PERFORMNUD,DAD>
	media: autoselect (1000baseT <full-duplex>)
	status: active
en9: flags=8963<UP,BROADCAST,SMART,RUNNING,PROMISC,SIMPLEX,MULTICAST> mtu 1500
	options=6467<RXCSUM,TXCSUM,VLAN_MTU,TSO4,TSO6,CHANNEL_IO,PARTIAL_CSUM,ZEROINVERT_CSUM>
	ether 00:e0:4c:68:0a:ab
	nd6 options=201<PERFORMNUD,DAD>
	media: autoselect (1000baseT <full-duplex>)
	status: active
bond0: flags=8943<UP,BROADCAST,RUNNING,PROMISC,SIMPLEX,MULTICAST> mtu 1500
	options=6067<RXCSUM,TXCSUM,VLAN_MTU,TSO4,TSO6,PARTIAL_CSUM,ZEROINVERT_CSUM>
	ether 00:e0:4c:68:0a:ab
	inet6 fe80::4b6:645c:b6da:611f%bond0 prefixlen 64 secured scopeid 0x19
	inet 10.112.254.20 netmask 0xffff0000 broadcast 10.112.254.255
	nd6 options=201<PERFORMNUD,DAD>
	media: autoselect (1000baseT <full-duplex>)
	status: active
	bond interfaces: en9 en6
AHS-5412-MDF# sh lacp peer

LACP Peer Information.


System ID: 883a30-768a00


  Local  Local                          Port      Oper    LACP     Tx
  Port   Trunk  System ID         Port  Priority  Key     Mode     Timer
  ------ ------ ----------------- ----- --------- ------- -------- -----
  A8     Trk1   50ed3c-22be32     8     32768     1       Active   Slow
  B8     Trk1   50ed3c-22be32     22    32768     1       Active   Slow
AHS-5412-MDF# sh mac-address trk1

 Status and Counters - Port Address Table - Trk1

  MAC Address       VLANs
  ----------------- ------------
  00e04c-680a0d     254
  00e04c-680aab     254
trunk A8,B8 trk1 lacp

show run vl 254

Running configuration:

Vlan 254
   name "Device Management"
   untagged Trk1
   ip address 10.112.254.254 255.255.255.0
   exit
[lldpcli] # sh ne
-------------------------------------------------------------------------------
LLDP neighbors:
-------------------------------------------------------------------------------
Interface:    en6, via: LLDP, RID: 4, Time: 0 day, 00:44:53
  Chassis:
    ChassisID:    mac 88:3a:30:76:8a:00
    SysName:      AHS-5412-MDF
    SysDescr:     HP J9851A Switch 5412Rzl2, revision KB.16.10.0012, ROM KB.16.01.0009 (/ws/swbuildm/rel_ajanta_qaoff/code/build/bom(swbuildm_rel_ajanta_qaoff_rel_ajanta))
    MgmtIP:       10.112.254.254
    Capability:   Bridge, on
    Capability:   Router, on
  Port:
    PortID:       local 8
    PortDescr:    A8
    TTL:          120
  Unknown TLVs:
    TLV:          OUI: 00,16,B9, SubType: 2, Len: 2 00,01
-------------------------------------------------------------------------------
Interface:    en9, via: LLDP, RID: 4, Time: 0 day, 00:45:00
  Chassis:
    ChassisID:    mac 88:3a:30:76:8a:00
    SysName:      AHS-5412-MDF
    SysDescr:     HP J9851A Switch 5412Rzl2, revision KB.16.10.0012, ROM KB.16.01.0009 (/ws/swbuildm/rel_ajanta_qaoff/code/build/bom(swbuildm_rel_ajanta_qaoff_rel_ajanta))
    MgmtIP:       10.112.254.254
    Capability:   Bridge, on
    Capability:   Router, on
  Port:
    PortID:       local 40
    PortDescr:    B8
    TTL:          120
  Unknown TLVs:
    TLV:          OUI: 00,16,B9, SubType: 2, Len: 2 00,01
-------------------------------------------------------------------------------
[lldpcli] #
As expected, it shows both interfaces, A8/B8, on the 5412.
Finally, to show that it worked here is a ping to an access point connected to another switch:
ping 10.112.254.155
PING 10.112.254.155 (10.112.254.155): 56 data bytes
64 bytes from 10.112.254.155: icmp_seq=0 ttl=64 time=5.203 ms
64 bytes from 10.112.254.155: icmp_seq=1 ttl=64 time=1.693 ms
64 bytes from 10.112.254.155: icmp_seq=2 ttl=64 time=1.613 ms
64 bytes from 10.112.254.155: icmp_seq=3 ttl=64 time=1.752 ms
^C
--- 10.112.254.155 ping statistics ---
4 packets transmitted, 4 packets received, 0.0% packet loss
round-trip min/avg/max/stddev = 1.613/2.565/5.203/1.524 ms
Wireshark
I opened Wireshark and Bond0 appeared in the capture interface dialog. While capturing, this was the title:

Listing everything about the Network!
macOS includes a utility called "networksetup". It has over 100 options! I can't cover all of them here. To see a complete list:
- Open a terminal
- enter networksetup 1
The 1 is an invalid option and networksetup will dump every option out as a list. You can also enter networksetup with no options and it will dump a help screen.
Getting Started with networksetup
List all network hardware:
networksetup -listallhardwareports
networksetup -listallhardwareports                                                                                                                     [22:11:57]

Hardware Port: Ethernet Adaptor (en3)
Device: en3
Ethernet Address: 1e:00:f2:0a:c4:65

Hardware Port: Ethernet Adaptor (en4)
Device: en4
Ethernet Address: 1e:00:f2:0a:c4:66

Hardware Port: Wi-Fi
Device: en0
Ethernet Address: 50:ed:3c:22:be:32

Hardware Port: Bluetooth PAN
Device: en13
Ethernet Address: 50:ed:3c:2c:91:ac

Hardware Port: Thunderbolt 1
Device: en1
Ethernet Address: 36:5f:f4:a6:93:80

Hardware Port: Thunderbolt 2
Device: en2
Ethernet Address: 36:5f:f4:a6:93:84

Hardware Port: Thunderbolt Bridge
Device: bridge0
Ethernet Address: 36:5f:f4:a6:93:80

VLAN Configurations
===================

VLAN User Defined Name: VLAN-254
Parent Device: en9
Device ("Hardware" Port): vlan0
Tag: 254
You can use the
networksetup -listallnetworkservices
command to list all network services on your Mac. On my M1 I have connected several different USB Ethernet adapters over time and created a Vlan interface. Here are what my services look like:
networksetup -listallnetworkservices
An asterisk (*) denotes that a network service is disabled.
Wi-Fi
iPhone USB
USB 10/100/1000 LAN 3
USB 10/100/1000 LAN
StarTech USBA2DPGB
USB 10/100/1000 LAN 2
Bluetooth PAN 2
Thunderbolt Ethernet Slot 1
Thunderbolt Bridge
VLAN-254
VPN (L2TP)
Now that you have a list of services, you can get information about them. In this case, my current wifi settings:
networksetup -getinfo Wi-Fi                                                                                                           [18:16:18]
DHCP Configuration
IP address: 10.0.23.119
Subnet mask: 255.255.252.0
Router: 10.0.20.1
Client ID:
IPv6 IP address: none
IPv6 Router: none
Wi-Fi ID: 50:ed:3c:22:be:32
List all the SSIDs that you have connected to:
networksetup -listpreferredwirelessnetworks en0
networksetup -listpreferredwirelessnetworks en0                                                                                                        [22:18:52]
Preferred networks on en0:
	The Paddock
	JCI_Guest WIFI
	Troys iPhone
	VOE2
	LAE GUEST
	CHE Guest
	VectorUSA Guest
	MPH Guest
	888-Secure
	888-Guest
	PD-Guest
	AirConsole-28
	AirConsole-D8
	Piconsole-02
	Employee
	RIV-guest
List Vlans that have been created:
networksetup -listVLANs
In this example, I have created vlan 254 using USB adapter en9
networksetup -listVLANs                                                                                                                                [21:33:59]

VLAN User Defined Name: VLAN-254
Parent Device: en9
Device ("Hardware" Port): vlan0
Tag: 254
The Airport Utility
One thing that every network engineer needs, especially a wireless network engineer, is information about the current Wi-Fi connection and the SSIDs in the area. macOS makes it easy to get this information.
You can hold down the ⌥ key and click on the Wi-Fi icon in the menu bar to get details on the current Wi-Fi connection. This brings up additional information compared to just clicking on the Wi-Fi icon. I don't know why Apple doesn't make this the default. Anyway, here is what the additional menu looks like:

From the terminal
Apple includes a utility called "airport" that lists information about the current Wi-Fi connection and other SSIDs in the area.
But, Apple hid it deep in the operating system. To make it easy to use, create a symbolic link using the following command in the terminal:
sudo ln -s /System/Library/PrivateFrameworks/Apple80211.framework/Versions/Current/Resources/airport /usr/local/bin/airport
Now you can type "airport" from any directory and the command will work.
Display Wi-Fi information
airport -I                                                                                                                                             [21:35:56]
     agrCtlRSSI: -52
     agrExtRSSI: 0
    agrCtlNoise: -90
    agrExtNoise: 0
          state: running
        op mode: station
     lastTxRate: 864
        maxRate: 144
lastAssocStatus: 0
    802.11 auth: open
      link auth: wpa2-psk
          BSSID: 9c:8c:d8:11:7a:f0
           SSID: test
            MCS: 0
        channel: 36,80
Scan the Wi-Fi environment
airport -s                                                                                                                                             [21:50:24]
                            SSID BSSID             RSSI CHANNEL HT CC SECURITY (auth/unicast/group)
                       LinksysJT d8:eb:97:33:01:a8 -96  6       Y  US WPA2(PSK/AES/AES)
                          ORBI72 c2:a5:11:ac:c0:22 -94  8       Y  -- WPA2(PSK/AES/AES)
                 LinksysJT_guest da:eb:97:33:01:a8 -94  6       Y  US WPA2(PSK/AES/AES)
             MySpectrumWiFic0-2G a4:08:f5:45:f3:c6 -93  1       Y  US WPA2(PSK/AES/AES)
                        jayzee59 c0:3c:04:a9:89:49 -92  1       Y  US WPA2(PSK/AES/AES)
                        V Family 92:3b:ad:af:a8:87 -83  11      Y  -- WPA2(PSK/AES/AES)
                            test 38:17:c3:12:0c:30 -78  52      Y  -- WPA2(PSK/AES/AES)
                            test 38:17:c3:12:0c:20 -71  11      Y  -- WPA2(PSK/AES/AES)
                       NETGEAR23 6c:cd:d6:be:e3:53 -71  4       Y  US WPA2(PSK/AES/AES)
  HP-Print-F8-Officejet Pro 8600 10:1f:74:63:41:f8 -66  1       N  -- NONE
                            test 9c:8c:d8:11:7a:e0 -45  1       Y  -- WPA2(PSK/AES/AES)
                            test 9c:8c:d8:11:7a:f0 -50  36      Y  US WPA2(PSK/AES/AES)
Scan a specific SSID
You can include an SSID after the -s to get information on only that SSID:
airport -s test
                            SSID BSSID             RSSI CHANNEL HT CC SECURITY (auth/unicast/group)
                            test 38:17:c3:12:0c:30 -76  52      Y  -- WPA2(PSK/AES/AES)
                            test 38:17:c3:12:0c:20 -67  11      Y  -- WPA2(PSK/AES/AES)
                            test 9c:8c:d8:11:7a:e0 -46  1       Y  -- WPA2(PSK/AES/AES)
                            test 9c:8c:d8:11:7a:f0 -50  36      Y  US WPA2(PSK/AES/AES)
This example is my lab. You can see that I have two APs, both of which have a 2.4Ghz and 5Ghz radio.
That does it for Part 4. Be sure to check back soon for Part 5!
