The switches can run in Bundle or install mode. Install mode is the recommended and is the method discussed in this blog.
Downloading the file
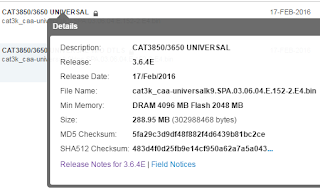
Log into Cisco.com's support site with your CCO credentials and search for the IOS XE file. Once you find the file click on the file name and copy the MD5 checksum value. You can drag your mouse over the hash to select it and then ctrl+c to copy it. We will need that to verify the file after we copy it to flash.In our case - MD5 Checksum: 5fa29c3d9df48f882f4d6439b81bc2ce
Using SCP
I wrote a blog on using SCP a while back. You can refer to it for more detail if needed Using SCP to transfer files. On MAC/Linux SCP is built in.On windows you will need to download an SCP tool. Since I use SuperPutty when I'm on Windows the Putty version of SCP (PSCP) is what I use. You can download it here. No install is required for PSCP and I saved it to my downloads folder.
If you prefer a GUI, WinSCP is a free open source graphical program for Windows.
On the switch, from global configuration mode, add "ip scp server enable" to enable SCP. You will need to be running a "K9" firmware version to use SCP. You can do a "sh ver | i K9" to determine if the switch is running a crypto image. Here is an example:
My-3850#sh ver | i K9
Cisco IOS Software, IOS-XE Software, Catalyst 4500 L3 Switch Software (cat4500es8-UNIVERSALK9-M), Version 03.06.04.E RELEASE SOFTWARE (fc2)
Hubbard_Test#
IP Address of the switch - 10.140.68.110
Username and password of a user on the switch - mhubbard / mW!yV1s^L1Bx
The filename to copy - cat3k_caa-universalk9.SPA.03.06.04.E.152-2.E4.bin
Once the download is complete open a cmd window, CD to the folder where you saved pscp and enter:
pscp -scp -pw mW!yV1s^L1Bx C:\tftp-root\cat3k_caa-universalk9.SPA.03.06.04.E.152-2.E4.bin mhubbard@10.140.68.110:flash:cat3k_caa-universalk9.SPA.03.06.04.E.152-2.E4.bin
pw - this is the password for the user. In this case mW!yV1s^L1Bx for user mhubbard
mhubbard@10.140.68.110 - mhubbard is the user on the switch and 10.140.68.110 is the IP
You will get some feedback on how fast the copy is going and a percent complete counter.
cat3k_caa-universalk9.SPA.03.06.04.E.152-2.E4.bin | 8784 kB | 798.5 kB/s | ETA: 00:06:35 | 2%
If SCP isn't enabled on the switch you will receive this message:
Administratively disabled.
Fatal: Received unexpected end-of-file from server
Copy switch to switch
If one switch already has the firmware on it you can use SCP to copy the image to anohter switch:My-3850#copy scp: flash:
Address or name of remote host [10.140.68.247]?
Source username [mhubbard]?
Source filename [cat3k_caa-universalk9.SPA.03.06.05.E.152-2.E5.bin]?
Destination filename [cat3k_caa-universalk9.SPA.03.06.05.E.152-2.E5.bin]?
Verifying the copy
This is the key step! Once the copy is complete log onto the switch and run a dir of flash:My-3850#dir
Directory of flash:/
40402 -rwx 2097152 Mar 16 2016 16:58:43 -07:00 nvram_config
40403 -rw- 2574 Oct 24 2014 04:58:09 -07:00 aup.html
40404 -rw- 344 Oct 24 2014 04:58:09 -07:00 failed.html
40405 -rw- 4082 Oct 24 2014 04:58:09 -07:00 login.html
40406 -rw- 318 Oct 24 2014 04:58:09 -07:00 loginscript.js
40407 -rw- 1116 Oct 24 2014 04:58:09 -07:00 logout.html
40408 -rw- 70123 Oct 24 2014 04:58:10 -07:00 yourlogo.jpg
40409 -rw- 2846 Oct 24 2014 04:58:09 -07:00 consent.html
40410 -rw- 984 Mar 15 2016 19:18:26 -07:00 vlan.dat
40418 -rw- 1234 Oct 24 2014 04:27:48 -07:00 packages.conf.00-
48483 -rw- 82653508 Dec 30 2014 19:27:39 -08:00 cat3k_caa-base.SPA.03.06.01E.pkg
40419 -rw- 1236 Dec 30 2014 19:27:48 -08:00 packages.conf
72722 drwx 4096 Oct 24 2014 04:28:16 -07:00 mnt
40412 -rw- 82672260 Oct 24 2014 04:27:36 -07:00 cat3k_caa-base.SPA.03.06.00E.pkg
40413 -rw- 6601404 Oct 24 2014 04:27:36 -07:00 cat3k_caa-drivers.SPA.03.06.00E.pkg
40414 -rw- 33747948 Oct 24 2014 04:27:36 -07:00 cat3k_caa-infra.SPA.03.06.00E.pkg
40415 -rw- 42769724 Oct 24 2014 04:27:37 -07:00 cat3k_caa-iosd-universalk9.SPA.152-2.E.pkg
40416 -rw- 25711500 Oct 24 2014 04:27:37 -07:00 cat3k_caa-platform.SPA.03.06.00E.pkg
40417 -rw- 98462528 Oct 24 2014 04:27:37 -07:00 cat3k_caa-wcm.SPA.10.2.102.0.pkg
72723 drwx 4096 Feb 20 2016 17:09:01 -08:00 dc_profile_dir
48484 -rw- 6625980 Dec 30 2014 19:27:39 -08:00 cat3k_caa-drivers.SPA.03.06.01E.pkg
48485 -rw- 33749996 Dec 30 2014 19:27:39 -08:00 cat3k_caa-infra.SPA.03.06.01E.pkg
48486 -rw- 42827072 Dec 30 2014 19:27:39 -08:00 cat3k_caa-iosd-universalk9.SPA.152-2.E1.pkg
64644 -rw- 25727884 Dec 30 2014 19:27:39 -08:00 cat3k_caa-platform.SPA.03.06.01E.pkg
64645 -rw- 99240768 Dec 30 2014 19:27:40 -08:00 cat3k_caa-wcm.SPA.10.2.111.0.pkg
40411 -rw- 302988468 Mar 16 2016 18:03:48 -07:00 cat3k_caa-universalk9.SPA.03.06.04.E.152-2.E4.bin
The file is in flash and the size, time/date stamp looks correct.
Now run the MD5 verify command. A lot of dots will scroll by before it completes, I truncated all but one row!
verify /md5 cat3k_caa-universalk9.SPA.03.06.04.E.152-2.E4.bin
.............................................................................................................................................................
.........................Done!
verify /md5 (flash:cat3k_caa-universalk9.SPA.03.06.04.E.152-2.E4.bin) = 5fa29c3d9df48f882f4d6439b81bc2ce
Compare it to the value from the Cisco site - 5fa29c3d9df48f882f4d6439b81bc2ce.
As you can see the file passed the verify operation.
Now we can start the installation:
My-3850#software install file flash:cat3k_caa-universalk9.SPA.03.06.04.E.152-2.E4.bin new verbose
Preparing install operation ...
[1]: Copying software from active switch 1 to switch 2
[1]: Finished copying software to switch 2
[1 2]: Starting install operation
[1 2]: Expanding bundle flash:cat3k_caa-universalk9.SPA.03.06.04.E.152-2.E4.bin
[1 2]: Copying package files
[1 2]: Package files copied
[1 2]: Finished expanding bundle flash:cat3k_caa-universalk9.SPA.03.06.04.E.152-2.E4.bin
[1 2]: Verifying and copying expanded package files to flash:
[1 2]: Verified and copied expanded package files to flash:
[1 2]: Starting compatibility checks
[1 2]: Finished compatibility checks
[1 2]: Starting application pre-installation processing
[1 2]: Finished application pre-installation processing
[1]: Old files list:
Removed cat3k_caa-base.SPA.03.06.01E.pkg
Removed cat3k_caa-drivers.SPA.03.06.01E.pkg
Removed cat3k_caa-infra.SPA.03.06.01E.pkg
Removed cat3k_caa-iosd-universalk9.SPA.152-2.E1.pkg
Removed cat3k_caa-platform.SPA.03.06.01E.pkg
Removed cat3k_caa-wcm.SPA.10.2.111.0.pkg
[2]: Old files list:
Removed cat3k_caa-base.SPA.03.06.01E.pkg
Removed cat3k_caa-drivers.SPA.03.06.01E.pkg
Removed cat3k_caa-infra.SPA.03.06.01E.pkg
Removed cat3k_caa-iosd-universalk9.SPA.152-2.E1.pkg
Removed cat3k_caa-platform.SPA.03.06.01E.pkg
Removed cat3k_caa-wcm.SPA.10.2.111.0.pkg
[1]: New files list:
Added cat3k_caa-base.SPA.03.06.04.E.pkg
Added cat3k_caa-drivers.SPA.03.06.04.E.pkg
Added cat3k_caa-infra.SPA.03.06.04.E.pkg
Added cat3k_caa-iosd-universalk9.SPA.152-2.E4.pkg
Added cat3k_caa-platform.SPA.03.06.04.E.pkg
Added cat3k_caa-wcm.SPA.10.2.140.0.pkg
[2]: New files list:
Added cat3k_caa-base.SPA.03.06.04.E.pkg
Added cat3k_caa-drivers.SPA.03.06.04.E.pkg
Added cat3k_caa-infra.SPA.03.06.04.E.pkg
Added cat3k_caa-iosd-universalk9.SPA.152-2.E4.pkg
Added cat3k_caa-platform.SPA.03.06.04.E.pkg
Added cat3k_caa-wcm.SPA.10.2.140.0.pkg
[1 2]: Creating pending provisioning file
[1 2]: Finished installing software. New software will load on reboot.
[1 2]: Committing provisioning file
[1 2]: Do you want to proceed with reload? [yes/no]: n
Notice that I selected no instead of yes to reload the switch. There is one more step to take before reloading. Initially I used tftp to copy and install the file in one step. I didn't verify or do this step. I ended up with one switch at rommon mode and one switch stack that was missing its configuration!
Run the following to see the packages:
My-3850#dir | i 3.06.04
40408 -rw- 82665136 Mar 15 2016 18:30:27 -07:00 cat3k_caa-base.SPA.03.06.04.E.pkg
40409 -rw- 4913852 Mar 15 2016 18:30:27 -07:00 cat3k_caa-drivers.SPA.03.06.04.E.pkg
40410 -rw- 33784816 Mar 15 2016 18:30:27 -07:00 cat3k_caa-infra.SPA.03.06.04.E.pkg
40412 -rw- 27417488 Mar 15 2016 18:30:28 -07:00 cat3k_caa-platform.SPA.03.06.04.E.pkg
My-3850#more flash:packages.conf
#! /usr/binos/bin/packages_conf.sh
Notice that this command runs a Linux shell command.
When it finishes make sure that all the packages are set to the 03.06.04 pkg.
sha1sum: b67332dea64aae6b5d80f92b19713413707f9c27
iso rp 0 0 rp_base cat3k_caa-base.SPA.03.06.04.E.pkg
iso rp 0 0 rp_infra cat3k_caa-infra.SPA.03.06.04.E.pkg
iso rp 0 0 rp_platform cat3k_caa-platform.SPA.03.06.04.E.pkg
iso rp 0 0 rp_iosd cat3k_caa-iosd-universalk9.SPA.152-2.E4.pkg
iso rp 0 0 rp_wcm cat3k_caa-wcm.SPA.10.2.140.0.pkg
iso rp 0 0 drivers cat3k_caa-drivers.SPA.03.06.04.E.pkg
#
# -start- superpackage .pkginfo
#
# pkginfo: Name: rp_super
# pkginfo: PackageFileType: iso
# pkginfo: BuildTime: Sat Feb 13 04:00:36 PST 2016
# pkginfo: ReleaseDate: Sat Feb 13 04:00:36 PST 2016
# pkginfo: .BuildArch: mips
# pkginfo: RouteProcessor: mips
# pkginfo: Platform: ng3k
# pkginfo: User: abhakat
# pkginfo: PackageName: cat3k_caa-universalk9
# pkginfo: Build: 03.06.04.E
# pkginfo: Dependencies: PROVIDES:cat3k_caa-base,03.06.04.E,mips;cat3k_caa-infra,03.06.04.E,mips;cat3k_caa-platform,03.06.04.E,mips;cat3k_caa-iosd-universalk9,152-
2.E4,mips;cat3k_caa-wcm,10.2.140.0,mips;cat3k_caa-drivers,03.06.04.E,mips;
# pkginfo: .SupportedBoards: unknown
# pkginfo: .BuildPath: unknown
# pkginfo: BuildType: Production
#
# -end- superpackage .pkginfo
#
At this point reload and go get a cup of coffee (or two) while it restarts!
But what if they don't match up?
I asked TAC and here is the response:**************************************************
After the package files are expanded and copied to flash, the running provisioning file (flash:packages.conf) is updated to reflect the newly installed packages, and the controller displays a reload prompt.
If this is not pointing to the correct version, run the software install command again and make sure you are not getting a new provisioning file, sometimes the .conf file name is changed and we need to modify the boot variable to the correct provisioned file.
Cisco refers to “packages.conf” as the provision file. Sometimes when we expand the images this file name might change, at the moment of the expand the same system let you know about the file name change, when this happen the only thing you need to do is to modify the boot variable to point to the new file.
Watch the install messages closely and if you see a message stating that the packages.conf file name has changed you MUST update the boot variable before reloading. If you don't the switch will reload to the switch: prompt.
**************************************************
Note: you will see packages.conf.00- if this is the first upgrade and packages.conf.01- if it's the second and so on. You can run more (a standard Linux command!) on these files just as packages.conf.
A Failed Upgrade
I mentioned earlier that before I started following this procedure I had a switch that booted to switch: after the upgrade. Here is a dir from that switch. You can see that the packages have 0 bytes. TAC said that was probably because I used tftp for the transfer and the .bin was corrupt.switch: dir flash:
Directory of flash:/
16161 drwx 4096 .
2 drwx 4096 ..
16162 -rwx 2097152 nvram_config
16163 -r-- 0 vlan.dat
16164 -rw- 1236 packages.conf.00-
0 -rw- 1236 cat3k_caa-base.SPA.03.06.01E.pkg
0 -rw- 1236 cat3k_caa-drivers.SPA.03.06.01E.pkg
0 -rw- 1236 cat3k_caa-infra.SPA.03.06.01E.pkg
0 -rw- 1236 cat3k_caa-iosd-universalk9.SPA.152-2.E1.pkg
16184 -rw- 1234 packages.conf.01-
16185 -rw- 1236 packages.conf
16170 drwx 4096 mnt
0 drwx 4096 cat3k_caa-base.SPA.03.06.00E.pkg
0 drwx 4096 cat3k_caa-drivers.SPA.03.06.00E.pkg
0 drwx 4096 cat3k_caa-infra.SPA.03.06.00E.pkg
0 drwx 4096 cat3k_caa-iosd-universalk9.SPA.152-2.E.pkg
0 drwx 4096 cat3k_caa-platform.SPA.03.06.00E.pkg
0 drwx 4096 cat3k_caa-wcm.SPA.10.2.102.0.pkg
16169 -rw- 2574 aup.html
16173 -rw- 344 failed.html
16174 -rw- 4082 login.html
16175 -rw- 318 loginscript.js
16176 -rw- 1116 logout.html
16177 -rw- 577536 yourlogo.jpg
16178 -rw- 2846 consent.html
16179 drwx 4096 dc_profile_dir
0 drwx 4096 cat3k_caa-platform.SPA.03.06.01E.pkg
0 drwx 4096 cat3k_caa-wcm.SPA.10.2.111.0.pkg
0 drwx 4096 cat3k_caa-base.SPA.03.06.03E.pkg
0 drwx 4096 cat3k_caa-drivers.SPA.03.06.03E.pkg
0 drwx 4096 cat3k_caa-infra.SPA.03.06.03E.pkg
0 drwx 4096 cat3k_caa-iosd-universalk9.SPA.152-2.E3.pkg
0 drwx 4096 cat3k_caa-platform.SPA.03.06.03E.pkg
0 drwx 4096 cat3k_caa-wcm.SPA.10.2.131.0.pkg
1557549056 bytes available (29929472 bytes used)
Operation timed out waiting for switch 2
I had this happen recently. I verified the copy but the install timed out on switch 2.
software install file flash:cat3k_caa-universalk9.SPA.03.06.10.E.152-2.E10.bin
Preparing install operation ...
[1]: Copying software from active switch 1 to switch 2
[1]: Finished copying software to switch 2
[1 2]: Starting install operation
[1 2]: Expanding bundle flash:cat3k_caa-universalk9.SPA.03.06.10.E.152-2.E10.bin
[1 2]: Copying package files
[1 2]: Package files copied
[1 2]: Finished expanding bundle flash:cat3k_caa-universalk9.SPA.03.06.10.E.152-2.E10.bin
[1]: % Operation timed out waiting for switch 2 to respond. Operation aborted.
It didn't say what operation timed out so I ran a dir on switch 2:
dir flash-2:
Directory of flash-2:/
8083 -rwx 2097152 Jul 9 2019 14:14:23 -07:00 nvram_config
8084 -rw- 1344 Feb 27 2019 00:21:09 -08:00 vlan.dat
8082 -rw- 302112348 Jun 27 2019 15:33:33 -07:00 cat3k_caa-universalk9.SPA.03.06.10.E.152-2.E10.bin
8101 -rw- 1236 Mar 7 2017 15:45:15 -08:00 packages.conf
40402 drwx 4096 Sep 11 2014 03:06:13 -07:00 mnt
40403 drwx 4096 Feb 27 2019 00:20:01 -08:00 dc_profile_dir
8089 -rw- 2574 Sep 11 2014 03:39:08 -07:00 aup.html
8092 -rw- 344 Sep 11 2014 03:39:08 -07:00 failed.html
8093 -rw- 4082 Sep 11 2014 03:39:03 -07:00 login.html
8094 -rw- 318 Sep 11 2014 03:39:08 -07:00 loginscript.js
8095 -rw- 1116 Sep 11 2014 03:39:08 -07:00 logout.html
8096 -rw- 70123 Sep 11 2014 03:39:08 -07:00 yourlogo.jpg
8097 -rw- 2846 Sep 11 2014 03:39:08 -07:00 consent.html
8103 -rw- 83293932 Mar 7 2017 15:45:12 -08:00 cat3k_caa-base.SPA.03.06.06E.pkg
8104 -rw- 3982012 Mar 7 2017 15:45:12 -08:00 cat3k_caa-drivers.SPA.03.06.06E.pkg
8105 -rw- 33788908 Mar 7 2017 15:45:12 -08:00 cat3k_caa-infra.SPA.03.06.06E.pkg
8106 -rw- 43074880 Mar 7 2017 15:45:13 -08:00 cat3k_caa-iosd-universalk9.SPA.152-2.E6.pkg
16161 -rw- 28394380 Mar 7 2017 15:45:13 -08:00 cat3k_caa-platform.SPA.03.06.06E.pkg
16162 -rw- 111233856 Mar 7 2017 15:45:13 -08:00 cat3k_caa-wcm.SPA.10.2.160.0.pkg
The .bin file is on switch 2 and the file size looks correct. I ran "more packages.conf" and "dir pack*.*" and everything looked go to boot into the old image. I reloaded and then the install completed successfully.
The switch was on 3.6.6 and hadn't been rebooted in over a year. I think that 3.6.6 may have a memory leak because I have had issues with this version where the console isn't reponsive or other issues and a reload always corrects it.


