Monday, March 15, 2021

Apple MacBook Air M1 for Network Engineers Part 2

Updated April, 9th, 2023

Now that we have the macOS interface set up, it's time to install some applications! 

If you haven't read part 1, you can find it at the link below: 
Apple MacBook Air M1 for Network Engineers Part 1

Part 3 is now published and can be found at the link below:
Apple MacBook Air M1 for Network Engineers Part 3

Part 4 is now published and can be found at the link below:
Apple MacBook Air M1 for Network Engineers Part 4

Part 5 is now published and can be found at the link below:
Apple MacBook Air M1 for Network Engineers Part 5


Cisco Devnet

Cisco has jumped into network automation in a big way. Several of the tools in our list come from Cisco's Developer Workstation and Environment Setup webpage. This page has setup guides for Windows, Mac, and Linux. It does require a login. I used my CCO but it looks like you can use GitHub or Google also.

The exam requirements are listed here. This page also has some good tutorials on it, well worth a look. They have moved the Developer Workstation links to this page.

If you can't log in, here is a similar site on GitHub that doesn't require a login:

Developer Workstation and Environment Setup on GitHub

DevNet Certification Guide

I am working on the DevNet certification. I have documented most of the journey here

A terminal for Intel specific apps

Since this is a tutorial for the new M1 Apple silicon, we will set up a terminal using Rosetta2 so that any terminal apps that fail to run because of the ARM architecture can be used in an emulated Intel terminal.

I got this one from the Mac Geek Gab podcast. 

  • Open Finder, expand the Utilities folder, right-click on "Terminal" and select duplicate.
  • Rename the new shortcut to "Terminal-Intel" or something you like.
  • Right-click, select Get Info, check Open Using Rosetta.

Now all Intel-based terminal apps should work.


Adding your SSH keys to GitHub

Here is the github.com documentation for creating and adding your SSH keys to github.com. 

I used this YouTube tutorial to learn how to set up git to push my local repositories up to GitHub.com

Git and GitHub for Beginners - Crash Course


Here is a list of the apps that we will be installing:


Simplenote

This is a free (for now anyway) note-taking app from Automatic. It's available for Mac, IOS, Linux, Windows, and Android so it fits my work life perfectly since I use all of those operating systems. It syncs to the cloud using the Automatic servers. Automatic is the company behind WordPress so they know cloud!

Simplenote supports MarkDown so if you are going down the developer path you can sharpen your MD skills in Simplenote. It supports "Tags" which allows you to categorize notes. Not as good as Evernote notebooks but it's free and works for me.

Open the Mac App Store, search for Simplenote and install.


Termius - SSH Client

Termius isn't a mere SSH client, it's a complete command-line solution. Securely access Linux or IoT devices from your Android or iOS mobile device, as well as any Windows, macOS, or Linux computer. It is Mosh-compatible, providing excellent reliability on high-latency constantly changing connections.

Again, a tool that works on every platform! I got in on Termius during the beta and it was only $5.99 a year which was well worth it. The devices you create sync across all platforms so no matter what device you grab, it has all your hosts on it.

But the cost has gone up to $8.99 per month. You can do a trial to see if you like it. 

Open the Mac App Store, search for Termius and install.

Xcode

This is a huge application, 11.6GB! But if you want to use iPerf3 and many other terminal apps you need it. It is the tool used to write MacOS and IOS apps if you want to try your hand at that. 

Installation

Open the Mac App store, search for xcode and install.


Git and diff-so-fancy

Xcode includes git. After Xcode is installed you can run: 

git --version

to check what version of git is installed

xcode also installs python 3.x.


diff-so-fancy is an addition to git. It also works with the built in "diff" command. It adds better coloring and other features to the "git diff" command.

Installation


brew install diff-so-fancy

Once diff-so-fancy is installed enter the following commands in the terminal:

Configure git to use diff-so-fancy for all diff output:

git config --global core.pager "diff-so-fancy | less --tabs=4 -RFX"
git config --global interactive.diffFilter "diff-so-fancy --patch"

Improved colors for the highlighted bits

Enter the following commands in the terminal to set the colors:

git config --global color.ui true

git config --global color.diff-highlight.oldNormal    "red bold"
git config --global color.diff-highlight.oldHighlight "red bold 52"
git config --global color.diff-highlight.newNormal    "green bold"
git config --global color.diff-highlight.newHighlight "green bold 22"

git config --global color.diff.meta       "11"
git config --global color.diff.frag       "magenta bold"
git config --global color.diff.func       "146 bold"
git config --global color.diff.commit     "yellow bold"
git config --global color.diff.old        "red bold"
git config --global color.diff.new        "green bold"
git config --global color.diff.whitespace "red reverse"


To use diff-so-fancy with the built in diff command:

diff -u file-a file-b | diff-so-fancy

Reference


Serial

Published by Decisive Tactics.

Connect to routers, servers, firewalls, industrial control and IoT devices with ease. Serial includes built-in, reliable support for almost every serial device on the market, sparing you the hassle of finding, installing, and updating drivers.

Supported chipsets

This app is $39.99 on the Mac App Store. I was reluctant to spend that much on a serial app but a co-worker highly recommended it. Now that I have used it I agree! The built-in driver support is great. I haven't connected any USB to Serial cable that didn't just work. And, the app pops a connect dialog up as soon as you connect the USB. Very nice.

Version 2 has SSH support also. I haven't used it yet because I have so many devices in Termius and it runs on all my platforms. But if you don't want to pay the subscription to Terminus, Serial might be a good alternative.

Open the Mac App store, search for serial and install.


Homebrew

Homebrew provides access to many standard applications and packages but isn't optimized for large binary-based applications. As an extension to brew, cask is available for installing GUI applications. To list any available casks, you would use the --cask or --casks option with the brew list command. Use the --help option on brew commands to learn more:

 brew list --help

Installation

Start the Terminal-Intel and paste the following:

/bin/bash -c "$(curl -fsSL https://raw.githubusercontent.com/Homebrew/install/HEAD/install.sh)"

  • brew help to get started
  • brew -v to check the version

Show installed packages

┌─[mhubbard@HP8600-4] - [/private/tftpboot] - [2885]
└─[$] brew list                                                                                              [18:33:19]
==> Formulae
arp-scan	cdpr		iproute2mac	libuv		nghttp2		socat		watch
arping		cheat		jemalloc	lldpd		node		speedtest-cli	xz
asciinema	duf		lft		lsusb		openssl@1.1	sqlite		yadm
autojump	exa		libev		minicom		pcre2		tcl-tk
bat		gdbm		libevent	mpdecimal	python@3.9	tcptraceroute
brotli		icu4c		libnet		mtr		readline	ticker
c-ares		iperf3		libpcap		ncurses		sipcalc		ugrep

==> Casks
font-inconsolata-nerd-font	ngrok				unofficial-wineskin
google-chrome			openconnect-gui
mark-text			powershell

Further documentation: 


Oh My ZSH

macOS Big Sur uses zsh as the shell. Oh my zsh is an add-on that provides many additional features. You can read up on OMZ on their website. From the GitHub readme

A delightful community-driven (with 1800+ contributors) framework for managing your zsh configuration. Includes nearly 300 optional plugins (rails, git, OSX, hub, docker, homebrew, node, php, python, etc), over 140 themes to spice up your morning, and an auto-update tool so that makes it easy to keep up with the latest updates from the community.

This is a free, open-source project. If you find OMZ useful, please make a donation to the project.

I found this guy's blog and it has some useful tips for OMZ 

https://github.com/AidanGlickman/Dotfiles-Mac/blob/master/terminal/.zshrc

The link is to his .zshrc file. I took quite a bit out of his config to help me get started. 

Installation

By default, macOS doesn't create a configuration file for zsh. Before installing Oh My ZSH create one using

nano ~/.zshrc

Add 

ZSH_DISABLE_COMPFIX=true 

as the first line of ~/.zshrc file. This prevents a security notice on Mac. There isn't a Security issue, it's a false alert, but you can't continue the install until you do this. I had a little "Chicken and egg" issue. I added the line but Oh My ZSH overwrote the .zshrc file. I added it back in, reran the curl command and then it worked.

I'm coming from Ubuntu and BASH. I didn't think I would like zsh but with Oh My ZSH I am sold. I plan to install zsh with Oh My ZSH on my Unbuntu box I like it so much.

Now run the following shell script. NOTE: Normally it's not smart to run a shell script with curl from the Internet but you can review the script on the Oh My ZSH GitHub before running it.

sh -c "$(curl -fsSL https://raw.githubusercontent.com/ohmyzsh/ohmyzsh/master/tools/install.sh)"

Now OMZ should be installed and working. 

Now we need to modify the .zshrc again.

Edit the .zshrc file 

nano ~/.zshrc

Press ctrl+w to search in nano and search for plugins

set plugins to:

plugins=(git zsh-completions zsh-autosuggestions zsh-syntax-highlighting)

Download the plugins

Look at the git clone, notice that it clones into your .oh-my-zsh/custom directory.

git clone https://github.com/zsh-users/zsh-completions ${ZSH_CUSTOM:=~/.oh-my-zsh/custom}/plugins/zsh-completions
git clone https://github.com/zsh-users/zsh-syntax-highlighting.git ${ZSH_CUSTOM:-~/.oh-my-zsh/custom}/plugins/zsh-syntax-highlighting
git clone https://github.com/zsh-users/zsh-autosuggestions ${ZSH_CUSTOM:-~/.oh-my-zsh/custom}/plugins/zsh-autosuggestions


Some Additional Plugins that I find useful

Colored-man-pages

This plugin is very simple, all it does is colorize your man pages. It doesn't require a separate download, just add it to the plugins section in .zshrc

Here is what it looks like in action:


Aliases

Once you start creating aliases it's hard to remember all of them. Also, I didn't realize that the plugins create their own aliases.

This plugin simply lists all your aliases when you type acs. This one doesn't require a download either, just add it to the plugins section of .zshrc.

Here are a few lines output by aliases

┌─[mhubbard@HP8600-4] - [/private/tftpboot] - [3233]
└─[$] acs                                                                                                                                          [20:14:27]
[\gitk]
	gk = \gitk --all --branches
	gke = \gitk --all $(git log -g --pretty=%h)

[_default]
	- = cd -
	... = ../..
	.... = ../../..
	..... = ../../../..
	...... = ../../../../..
	_ = sudo
	afind = ack -il
	cat = bat
	ec = subl /Users/mhubbard/.zshrc
	egrep = egrep --color=auto --exclude-dir={.bzr,CVS,.git,.hg,.svn,.idea,.tox}
	exa1 = exa -lFT --group-directories-first
	extip = dig +short myip.opendns.com @resolver1.opendns.com
	fgrep = fgrep --color=auto --exclude-dir={.bzr,CVS,.git,.hg,.svn,.idea,.tox}
	ggpur = ggu


Git

This plugin provides a lot of aliases for git. If you aren't using git then there is no need to add it in. This plugin doesn't require a separate download either. Just add "git" to the plugins section.


ZSH Docker Aliases

An amazing collection of Docker aliases. The project GitHub has a complete listing of the aliases.

Installation

git clone https://github.com/akarzim/zsh-docker-aliases.git  ~/.oh-my-zsh/custom/plugins/zsh-docker-aliases
# then add `zsh-docker-aliases` to `plugins` in your .zshrc

Project GitHub


Here is what my plugins section looks like:

plugins=(git 
            zsh-completions
            zsh-autosuggestions
            zsh-syntax-highlighting
            history-substring-search
            colored-man-pages
            aliases
            zsh-docker-aliases
        )


There are many more plugins for zsh. They can be found here: ZSH Plugins webpage


Set the editors to use

Set nano as the editor when using ssh and VSCode when not.

Find the line below, uncomment the if statement. Change the EDITOR variable to nano and code. NOTE: We will install VScode next so don't run the zsh edit command until we finish installing VSCode.

Preferred editor for local and remote sessions

if [[ -n $SSH_CONNECTION ]]; then
  export EDITOR='nano'
  else
  export EDITOR='code'
 fi

Add some aliases to the .zshrc file

Obviously, aliases are very personal. You may not want the ones I have added, but they are good examples of how to create aliases if you want to create your own. Once you get used to aliases you will wonder how you got by without them.

Update - I found a blog on aliases and it suggested put a 2 charcter prefix on your aliases. That way you can type the 2 characters, hit tab twice, and all of your personal aliases will be listed. 


At the time of this writing, macOS includes Python 2.7. Since most of my tools are Python 3 I created these two aliases:

alias python=python3
alias pip=pip3

Show IP Address, Default GW, and name servers for wifi

alias ipen0='ifconfig en0 | grep "ether\|broadcast";netstat -nr | grep default | grep en0;cat /etc/resolv.conf | grep -v \#'

└─[$] ipen0 [19:55:49] ether 50:ed:3c:22:be:32 inet 192.168.10.143 netmask 0xffffff00 broadcast 192.168.10.255 default 192.168.10.254 UGScg en0 nameserver 1.1.1.1 nameserver 208.67.222.222 inet6 fe80::1c73:952b:1fdf:6cda%en0 prefixlen 64 secured scopeid 0xc

NOTE - On the M1 I had to add the \ character in front of the # symbol. Do not include it if you are on an Intel Mac.

┌─[mhubbard@HP8600-4] - [~/.ssh] - [3155]
└─[$] ipen0 
ether 50:ed:3c:22:be:32
inet 192.168.10.143 netmask 0xffffff00 broadcast 192.168.10.255
default            192.168.10.254     UGScg          en0
nameserver 1.1.1.1
nameserver 208.67.222.222


Show IP Address, Default GW, and name servers for en6

alias ipen6='ifconfig en6 | grep "ether\|broadcast";netstat -nr | grep default | grep en0;cat /etc/resolv.conf | grep -v \#'

NOTE - On the M1 I had to add the \ character in front of the # symbol. Do not include it if you are on an Intel Mac.

If you use a lot of different USB adapters you can use an alias with command line parameters. That way you just enter ipen<interface #> instead of having to create an alias for each interface.

alias ipenx='(){ifconfig en$1 | grep "ether\|broadcast";netstat -nr | grep default | grep en$1;cat /etc/resolv.conf | grep -v \# ;}'

NOTE - On the M1 I had to add the \ character in front of the # symbol. Do not include it if you are on an Intel Mac.

Example

I plugged in a USB 3.0 Ethernet adapter. It came up as en10.

ifconfig en10
en10: flags=8863<UP,BROADCAST,SMART,RUNNING,SIMPLEX,MULTICAST> mtu 1500
options=6467<RXCSUM,TXCSUM,VLAN_MTU,TSO4,TSO6,CHANNEL_IO,PARTIAL_CSUM,ZEROINVERT_CSUM>
ether 00:e0:4c:68:00:c2
inet6 fe80::18c6:afde:6f:b92f%en10 prefixlen 64 secured scopeid 0x17
inet 192.168.10.149 netmask 0xffffff00 broadcast 192.168.10.255
nd6 options=201<PERFORMNUD,DAD>
media: autoselect (1000baseT <full-duplex>)
status: active

ipenx 10

ether 00:e0:4c:68:00:c2
inet 192.168.10.149 netmask 0xffffff00 broadcast 192.168.10.255
default            192.168.10.254     UGSc          en10
nameserver 1.1.1.1
nameserver 208.67.222.222

I found this on stackexchange.com -  zsh alias with parameter

IPv6

I have started to work with IPv6 a lot lately. I added some code to the IP alias to show the IPv6 address along with the IPv4 address information. 

alias ipen0='ifconfig en0 | grep "ether\|broadcast";netstat -nr | grep default | grep en0;cat /etc/resolv.conf | grep -v \#;ifconfig en0 | grep inet6'

┌─[mhubbard@HP8600-4] - [~/.ssh] - [3154]
└─[$] ipen0                                                                                              
ether 50:ed:3c:22:be:32
inet 192.168.10.143 netmask 0xffffff00 broadcast 192.168.10.255
default            192.168.10.254     UGScg          en0
nameserver 1.1.1.1
nameserver 208.67.222.222
inet6 fe80::1c73:952b:1fdf:6cda%en0 prefixlen 64 secured scopeid 0xc


If you just want the IPv6 Address you can use this alias

alias ipen0='ifconfig en0 | grep "ether\|broadcast";netstat -nr | grep default | grep en0;cat /etc/resolv.conf | grep -v \#;ifconfig en0 | grep inet6 | awk -F " " '\''{print $2}'\'' | sed 's/%en0//''

┌─[mhubbard@HP8600-4] - [~/.ssh] - [3155]
└─[$] ipen0                                                                                                
ether 50:ed:3c:22:be:32
inet 192.168.10.143 netmask 0xffffff00 broadcast 192.168.10.255
default            192.168.10.254     UGScg          en0
nameserver 1.1.1.1
nameserver 208.67.222.222
fe80::1c73:952b:1fdf:6cda


# Return the public IP address you are using

alias extip="dig +short myip.opendns.com @resolver1.opendns.com"

# open ~/.zshrc in using the default editor specified in $EDITOR

alias ec="$EDITOR $HOME/.zshrc"

# reload ~/.zshrc after making changes to active the changes

alias sc="exec zsh"

Exit Nano (CTRL+X), Y to save, enter to exit.

Now refresh the .zshrc file
exec ~/.zshrc

You can now enter sc to refresh the .zshrc file!

Search History

Allow searching with the up arrow
Add "history-substring-search" to the plugins line:

plugins=(git zsh-completions zsh-autosuggestions zsh-syntax-highlighting history-substring-search)

After adding the search history to the plugin line, add this after the aliases
bindkey "^[[A" history-search-backward
bindkey "^[[B" history-search-forward

You can use the bindkey command to list all of your keyboard shortcuts in zsh.

Save and run the sc alias to reload oh my zsh


Oh My ZSH is now ready to run!

Type 
ip [enter]
and you should see a nicely formatted output of the wifi ip address, gw, and DNS servers.

ip
ether 50:ed:3c:22:be:32
inet 192.168.10.139 netmask 0xffffff00 broadcast 192.168.10.255
default            192.168.10.254     UGSc           en0
nameserver 1.1.1.1
nameserver 208.67.222.222

Type
extip [enter]

and you should see the public IP you are using.

To search command history, enter a couple letters and then press the UP arrow. It's a small thing but it will make a big difference in your daily use of the terminal.

Themes

Oh My ZSH has a lot of prebuilt themes that you can use. I like to have my cursor below the name and path since some of my paths get pretty long. I am currently using a theme named "duellj". Here is what it looks like:


The number after the path is the current history number. That is useful if you want to repeat a previous command using !<history number>. 

To change your theme just open the .zshrc file (ec if you added the alias) and find the entry for ZSH_THEME and set it to duellj:

ZSH_THEME="duellj"

The repository of themes is listed in the reference section below. 

Fixing Path issues in ZSH

After adding a lot of programs and customizing my .zshrc file I noticed that my path statement had several duplicate values. I found this article My PATH Variable is a Mess on the towardsdatascience.com site. It's worth reading even if your path isn't a mess and covers both macOS and Ubuntu!

TLDR - add "typeset -U PATH" as the last line in your .zshrc file

References for Oh My ZSH


The open command in terminal

A co-worker pointed this utility out to me and is useful when you are working in zsh. 

Open finder in the current directory

You can use the following to open finder in the folder that you are in:

open . 

That's the word "open" with a dot.

Open an application

open -a Wireshark
 
Will open Wireshark or switch to Wireshark if it is already running. You could do that easy enough using spotlight search so why is this useful? What if you wanted to open a second instance of Wireshark? If you use spotlight it will just switch to the open instance of Wireshark. 

With open you can use:

open -n -a Wireshark 

The -n opens a new instance. 

I created the following lines in my .zshrc file for opening a new Wireshark instance:

#allow opening multiple Wireshark windows
wireshark='open -n /Applications/Wireshark.app'


Open an application with a file

open edge_template.txt


will open edge_template.txt in whatever application you have associated with a .txt file.

Again, not earth-shattering, also, you can open every associated file in a folder:

open *.txt 

If you have projects organized in a way where you only have a handful of files of type in a folder this is useful.

Open a file in finder

I don't use this often but you can have "open" reveal a file in finder
open -R ~/networkRefresh/templates/edge_template.txt

Here is the result, finder is brought to the front with edge_tepm


VS Code 

Installation

Browse to code.visualstudio.com

Download the universal app and run the installer.

Customize

Open VS Code to display the main interface

Add VSCode to the MacOS path

 This is required to use code as the zsh editor and be opened from the terminal by typing code

Open the Command Palette (F1) and type "shell command" to find the "Shell Command: Install 'code' command in PATH" command:


This works as expected, but I have found that when I close code it removes the path. There must be a way to make it permanent but I haven't found it.

Add the Python extension

On the left, click the extensions view icon

Extension Icon

search for "python" and install:


"Python 
IntelliSense (Pylance)
Microsoft."

The latest version as of this writing is the December 2021 release. It includes "Pylance" which MS says provides robust and performant language features to Python users in Visual Studio Code. There is a link to the release page for Pylance in the reference section below.


There are hundreds of more extensions for Code. You can go to VSCode Marketplace to find more. 

This blog has some advice on what to add - vscode extensions to become a more productive developer

Themes

There a lot of custom themes available in the marketplace. Regardless of your tastes you will be able to find one that like. I put a link to a review of 10 of the most downloaded themes in the reference section below. I am currently using the github theme. It comes with several light and dark themes. I am using dark with high contrast. You can install it by clicking here.

This is what the Github Dark High Contrast theme looks like:


A great feature of VS Code for python is that it keeps track of your variable names and you can instantly jump to them. In the screenshot above, you can see that the cursor is on the variable "fabric". I jumped to fabric by clicking on the Icon that looks like a rectangle just above the code window. That generates a drop down list of variables in the program, select the one you want and it jumps to it.


How to disable telemetry reporting

Note: I leave this enabled so that MS can improve the product. If that is disagreeable to you, follow these steps to disable it.

VS Code collects usage data and sends it to Microsoft to help improve our products and services. Read our privacy statement and telemetry documentation to learn more.

If you don't want to send usage data to Microsoft, you can set the telemetry.telemetryLevel user setting to off.

From File > Preferences > Settings (macOS: Code > Preferences > Settings), search for telemetry, and set the Telemetry: Telemetry Level setting to off. This will silence all telemetry events from VS Code going forward.

Important Notice: VS Code gives you the option to install Microsoft and third-party extensions. These extensions may be collecting their own usage data and are not controlled by the telemetry.telemetryLevel setting. Consult the specific extension's documentation to learn about its telemetry reporting.

Sync Settings to multiple laptops

VS Code has a built-in method to sync settings between multiple machines. Obviously useful if you develop on more than one machine.

Click the gear icon on the bottom left of the screen, select "Turn on Settings Sync...". 


You will have to log in using a Github or MS account. 


A new browser window will open so that you can log in. After signing in, Settings Sync will be turned on and continue to synchronize your preferences automatically in the background. 

Syncing a second laptop

Since syncing can involve conflicts you will have to make a choice when you set up the second laptop.


Reference


Powershell

Microsoft open-sourced Powershell a while back. I usually install it on Linux, I have found that scripts that don't access a drive letter usually work on Linux. There is one script from Black Hills Information Security that I use all the time. You can read about it here

1..1024 | % {$test= new-object system.Net.Sockets.TcpClient; $wait = $test.beginConnect("allports.exposed",$_,$null,$null); ($wait.asyncwaithandle.waitone(250,$false)); if($test.Connected){echo "$_ open"}else{echo "$_ closed"}} | select-string " "


Installation

brew install --cask powershell

After the install finishes you will need to update the help file.

update-help

Powershell is installed into this folder:
/usr/local/microsoft/powershell/7


Running Powershell
Open a new tab in iTerm2 and enter:
pwsh 

Here is a link to a simple PowerShell script I wrote to create DHCP reservations for printers. It ran perfectly on macOS:

Today I needed to create DHCP reservations for some Access Points. I had the script above but I wanted to read the data from a CSV file. Here is the script modified to read the data from a CSV file.

param([string]$server = "server", [string]$scope = "scope")
$a = Import-Csv DHCP.csv
foreach ($item in $a) {
$ip=$($item.IP)
$mac=$($item.MAC)
#remove colons since MS DHCP can't deal with a real mac address
$mac=$mac-replace'[:]'
$name = $($item."AP-Name")
write-host "netsh dhcp server $server scope $scope add reservedip $ip $mac $name"
}


I created an Excel sheet like this:


Notice that the first MAC address doesn't have colons. When I get an asset sheet from my office the MAC addresses don't have colons. The script removes colons if they are there.


Here is the output:

PS /Users/mhubbard/GoogleDrive/Test/configs> ./dhcp-csv.ps1 -server 192.168.10.221 -scope 10.112.105.0
netsh dhcp server 192.168.10.221 scope 10.112.105.0 add reservedip 10.112.105.100 a44c1138fa5b AP1
netsh dhcp server 192.168.10.221 scope 10.112.105.0 add reservedip 10.112.105.101 04d5900e779b AP2
netsh dhcp server 192.168.10.221 scope 10.112.105.0 add reservedip 10.112.105.102 b0faebdde8a6 AP3
netsh dhcp server 192.168.10.221 scope 10.112.105.0 add reservedip 10.112.105.103 a44c1138fa59 AP4
netsh dhcp server 192.168.10.221 scope 10.112.105.0 add reservedip 10.112.105.104 5057a86e4b49 AP5

I know that you could do the same thing in Python. But most customers are on Windows and Python isn't installed by default but PowerShell is. If you use PowerShell you can give the script to any Windows user and they can run it.

Note: Guido Von Rossum, the inventor of Python, now works at Microsoft! Maybe Python will be installed by default in the future.

The PowerShell ISE isn't available on macOS but Microsoft has a plugin for Visual Studio Code. The link to how to install the plugin is in the references below.

This article gives some tips on writing PowerShell scripts that work on Windows/Mac/Linux

VMWare PowerCLI
One advantage of Microsoft open sourcing PowerShell is that VMWare's PowerCLI modules can be used on macOS and Linux! From inside PowerShell run the following to install PowerCLI:

Install-Module -Name VMware.PowerCLI

You will be prompted that the repository isn't trusted. The modules are being pulled from the PowerShell gallery. If you don't trust it you can use the link below to download the raw files and inspect them before installing them. You can also use that method to install them on a server without Internet access.

Zip file with the modules: VMware PowerCLI
VMWare's installation guide is here: Install PowerCLI
VMWare's PowerCLI User's Guide can be downloaded here: PowerCLI 12.1.0 User's Guide

Since VMWare is the 800 pound gorilla of Enterprise virtualization, there is a vast amount of resources on the Internet. This blog is a great introduction to installing and using PowerCLI


Connecting to a vCenter server

Connect-VIServer -Server 10.23.112.235 -Protocol https -Username 'Adminis!ra!or' -Password 'pa$$word'


PowerShell path on macOS

For some reason the PowerShell install didn't add the path. PowerShell is installed at:

$HOME/.local/share/powershell

and scripts are installed at

$HOME/.local/share/powershell/Scripts

From inside the PowerShell terminal, you can use:
 
$Env:PATH 

To display the current path.

You can add the path to the PowerShell profile using:

nano $PROFILE

To open the profile, then:

$Env:PATH += ":$HOME/.local/share/powershell/Scripts"

to add the path. You will need to close and re-open the PowerShell terminal.

PowerShell Gallery

Microsoft maintains a "Gallery" of PowerShell scripts. Some are written by Microsoft, and others are provided by the community. 

MS provides quite a bit of documentation for the Gallery. This link is a good place to start

PowerShell Gallery

You can view the repositories that are installed in PowerShell using "Get-PSRepository"


As you can see, I just have the default repository from Microsoft. And you can see that the Installation Policy is untrusted. When you install a script from the Gallery you will be prompted that the repository is untrusted.


I entered y to allow the installation to continue. You can use the "Set-PSRepository" command to trust the repository. I chose not to since there are a lot of community-provided scripts and I don't know how deep MS looks at the code.


DSC - Desirable State Configuration
I saw a lot of scripts listed at "DSC" which I found stands for Desirable State Configuration. I didn't dig into it since I don't build Windows machines, but they appear to be scripts that install roles and configure Windows per MS best practices.


Finding Scripts
You can go to the PowerShell Gallery Homepage and browse/search for scripts. I went there and searched for "dhcp". It returned two pages of scripts! 

You an also search from the terminal:

Find-Script 
with no arguments will return all scripts, but there are so many you will have to put them into a text file to be useful.

If you know the EXACT name of the script you can use the -name argument. In this example I knew that the script I wanted to install is called "Ping-MultipleHosts"


I have found that the community scripts are hosted on GitHub and there is a link on the Gallery page that takes you to the project homepage. I like to go there and review the code before I install it. More to learn than to see if it's malicous.

Once you find the script in the gallery run "Install-Script":
Install-Script Ping-MultipleHosts

This will download the script to:

$HOME/.local/share/powershell/Scripts

ls $HOME/.local/share/powershell/Scripts
InstalledScriptInfos Ping-MultipleHosts.ps1

Then execute the script:


There is a lot more to PowerShell and now that it works on Linux/Mac, it is well worth the time to learn some. I am working on some PowerShell tools that will aid in deploying Dynamic Arp Inspection on switches. I created this GitHub repo if you are interested in looking at them.


Reference


Autojump

https://github.com/wting/autojump

autojump is a faster way to navigate your filesystem. It works by maintaining a database of the directories you use the most from the command line. Directories must be visited first before they can be jumped to.

Installation

brew install autojump

Add

[ -f /usr/local/etc/profile.d/autojump.sh ] && . /usr/local/etc/profile.d/autojump.sh

To the .zshrc file

Remember, you can type ec [enter] to open the .zshrc file in VScode.

Example, from my home folder
j pro
/Users/mhubbard/GoogleDrive/Python/Scripts/prod
➜ prod git:(master) ✗

NodeJS

If you are planning to get Cisco's DevNet cert you need NodeJS.

 brew install node

A lot of information scrolls past during the install. I didn't do any of the suggested modifications to my path. I saved the messages so if I run into issues I can follow the suggestions.


Postman

Postman is a tool for working with RESTful APIs. You will need it if you are working on the Cisco DevNet cert or just using a REST API on a switch.

Download Postman

Install the package as normal. 

Open Postman and follow the instructions to create an account


Ngrok

From the ngrok website

Spend more time programming. One command for an instant, secure URL to your localhost server through any NAT or firewall.

You will need ngrok if you are working on the Cisco DevNet cert

brew install --cask ngrok

Verify

 ngrok http 8000

ngrok by @inconshreveable                                                                                     (Ctrl+C to quit)

Session Status                online

Session Expires               1 hour, 59 minutes

Version                       2.3.35

Region                        United States (us)

Web Interface                 http://127.0.0.1:4040

Forwarding                    http://441c7dc90556.ngrok.io -> http://localhost:8000

Forwarding                    https://441c7dc90556.ngrok.io -> http://localhost:8000


Connections                   ttl     opn     rt1     rt5     p50     p90

                              0       0       0.00    0.00    0.00    0.00


Now start a python http server on port 8000 in a new iTerm tab

python http.server 8000

Open a browser and enter

http://441c7dc90556.ngrok.io

You will need to allow Python to accept incoming connections in System Preferences, Security & Privacy. The easiest way to do that is to stop/start the firewall after you start the Python web server. It will ask if you want to allow incoming connections to the python server.

This blog has some demos on ngrok. It's a little dated but still useful.

Ngrok with macOS


Google Chrome

brew install --cask google-chrome

Chrome is a universal app now.


Open Connect

An open source VPN client that can be used to connect to Cisco DevNet labs.

You will need Open Connect if you are working on the Cisco DevNet cert

Brew install --cask openconnect-gui


Minicom

minicom is an terminal app that allows you to connect to USB to Serial cables and console into devices. 

brew install minicom

To set the "Meta" key to be the Mac Option key

Terminal > Preferences... (or type ⌘+,). Then, Profiles > Keyboard and check the box Use Option as Meta key.

https://www.shell-tips.com/mac/meta-key/

Before starting minicom you need to know the name of the com port that macOS assigned to your USB adapter. Open a terminal and enter:

ls -l /dev/tty.usb*

You should see something like this:

ls -l /dev/tty.usb*

crw-rw-rw-  1 root  wheel    9,   6 Mar 15 15:54 /dev/tty.usbserial-1140

The first time you run minicom use

minicom -s 

to enter setup mode. Scroll down to "Serial port setup" and press enter.

Use /dev/tty.usbserial-1140 for option A - Serial Device.


If you use a different USB cable you can start with:

minicom -D /dev/tty.usbserial-(name of new cable)

Logging

You can use -C (path/filename) to save a log.


That's enough for one blog! In the next installment, I will cover more networking tools like iPerf3, Wireshark, arp-scan, etc. Be sure to check back soon.



Sunday, March 14, 2021

Apple MacBook Air M1 for Network Engineers Part 1

Parts 2 -5 are now published. You can find them 

I haven't used a Mac as a daily driver for a few years. I switched over to Ubuntu when I started working on my python, Git, and dev skills for the Cisco Devnet program. Ubuntu is a great platform for dev work because there are so many free, open-source tools and it will run on almost any hardware from a Raspberry Pi to a maxed-out desktop. 

But I had to have a new Mac once the ARM-based Apple Silicon Macs were announced! Battery life was the biggest factor but I also wanted the instant-on, iPad-like performance of the Apple Silicon. It makes me smile every time I open the lid and it is just ready to go. Add in Touch-ID, Retina display, and the Big Sur version of macOS and it made the money jump right out of my wallet!

I hadn't used Big Sur since my current MacBook is a 2012 MacBook Pro, so I had some research to do. Luckily there are plenty of YouTube videos with tips on setting up the new M1 Macs and on the new features of Big Sur.  

Some videos to get you started:

Some useful webpages

Search for emails in Mail on Mac - If you decide to use Apple Mail, this is useful.


I also used a few podcasts:

  • Mac Geek Gab
  • Mac Power Users
  • Automators

to get up to speed. 

They are two different kinds of podcasts. Mac Geek Gab focuses on "Cool Stuff Found" which is hardware/software that works with the Mac and "Quick Tips" which are tips on using IOS and macOS.

Mac Power Users is a podcast on getting maximum productivity out of macOS. I don't use most of the software that they recommend. Most of the software is subscription-based and it gets out of control fast. But, they offer a lot of productivity tips for macOS itself and I find the podcast worth my time to listen to.

One quick tip for wireless:

Hold down the option key while clicking on the wifi icon to get additional information on the connection. It's great to be able to see the channel, MCS, RSSI, Noise Floor, transmit rate, and Phy Mode instantly.


One quick tip for Bluetooth:

If you are having trouble with Bluetooth devices you can try resetting the Bluetooth module. Simply press the Shift + Option keys, then click on the Bluetooth icon in the menu bar. You will see an option to "Reset the Bluetooth module". Click on it and the Bluetooth will be reset. 

You won't have to re-pair the devices, this just resets the Bluetooth module. 


As you can see, you can factory reset all connected Apple devices or remove all devices.

TIP: If you need to save a file to a system location such as an nmap script to "/usr/loca/share/nmap/scripts", you can press shift+cmd+g" to open a "go to folder" dialog.  Type the path into the dialog. Tab completion is supported.


Initial Setup

Apple has a startup script that did a good job of getting me logged in and working. But I learned a lot from the videos and podcasts so I did some customizing.

Preferences

If you are moving from Windows or Linux, macOS has some defaults that you will probably want to change. The first thing I did was use the System Preferences app to fix them. On macOS, you move the mouse to the top left of the screen and click on the Apple icon to open system preferences.


Change the view to Organize alphabetically


On the View menu, select "Organize Alphabetically" instead of the default "Organize by Categories".


Now preferences will look like this:


You can also hide any icons that you are sure you won't need. On the View menu, click Customize. Checkmarks will appear on each icon. Uncheck any that you don't want to see.


General Category

Show scroll bars:

    Always


This turns the scroll bars on all the time. The default is to hide them until you click into a window in Finder. I find that very annoying.


Apple ID

    iCloud Drive, options - turn off Desktop & Documents


If you don't do this and you are on-site with no Internet service your files will not be available


Security & Privacy


General

You can set a message that will show on the lock screen. I do this in case a customer doesn't know it's mine and sees it in the data center.

  • Click the lock in the lower left and enter your password. 
  • Put a check in the box next to "Show a message when the screen is locked.
  • Click on the drop-down "Set Lock Message..."

  • Enter your message and click OK.
  • Click the lock again to lock the General settings


Firewall

By default the firewall is disabled. You should enable it.
    

    Firewall
        Click - Turn On Firewall


Trackpad

    Point & Click

  • A lot of Mac users check the "Tap to Click" option. I tried it and didn't like it. You should give it a shot, maybe it will work for you.
  • Click - Set to Firm


More Gestures

        Click the More Gestures tab and enable App Expose. I used the Swipe down with four fingers gesture.


 App Expose is used to show all windows of an application on the screen. 


I found that in the Mission Control preference panel you can setup "Application Windows" to use different keys. I set the CMD key on the right side to show the application windows. I like that better than the four-finger swipe.


Display

Night Shift will change the display color slightly towards to warmer end of the spectrum. This is supposed to help you relax when using the laptop at night.  I have it set to run from sunset to sunrise. When it activates, a checkmark will appear in the "Turn on Until Sunrise" box.


Desktop

    Apple, Colors

    I'm going for maximum battery life and minimum distraction so I set the desktop to solid black. One interesting side effect is that I use a DisplayLink monitor in the field. While setting it up I thought it wasn't working. After some time troubleshooting, I realized that with no apps moved to it I was looking at the black desktop and it was working! Just a heads up.


    Screen Savers - set up Hot Corners 

        If you hold down the Option key while selecting a corner in Preferences then the corner isn't active unless you also hold down the Option key. I use the Apple icon a lot and this prevents me from showing the desktop when I meant to show the icon.


        Top Left - Option+Desktop

        Bottom Left - Mission Control

        Top Right - Notification Center

        Bottom Right - Launchpad


Accessibility

I like to be able to move windows with the trackpad so I enable dragging.
    Pointer Control, Trackpad Options
          Enable Dragging - three-finger drag


Dock and Menu Bar

I like the dock to be smaller than the default and to auto-hide. I also like to have the menu bar at the top auto-hide. This is a personal preference and I find that most people don't like it. It's worth trying.

    Put a check in Magnification. Adjust the slider to suit. I like about 60%
    Under Position on Screen, select Left.
    Put a check in Automatically hide and show the Dock
    Menu Bar - Check Automatically hide and show the menu bar


Do Not Disturb

In keeping with the minimum distraction, maximum productivity theme I want quick access to the Do Not Disturb options.

    Put a check in Show in Menu Bar and select Always


Keyboard Brightness
  Put a check in Show in Menu Bar


 Battery
   Put a check in Show Percentage


 Clock 
    Most users won't want my clock settings. I prefer 24-hour format so that there is no confusion between 06:00AM and 6:00PM. I am also fanatical about using a stopwatch and I want to see seconds. It drives me crazy that on the iPhone the clock app has no option to display seconds. 

    If anyone is interested, it takes me on average 29 seconds from when I turn the ignition off until I am pumping gas at Costco. I have done 27 seconds, and occasionally 30 seconds. (Update - Costco now has the Tap to Pay on the pumps. It has cut 5 seconds off my time.)

    Finally, with my ADHD I can lose all track of time and work on a task for far too long, so the Mac announces the time every 15 minutes.
   
       Put a check in Use 24 hour clock
       Put a check in Flash the time separators
       Put a check in Display the time with seconds
       Put a check in Announce the time


Dock

    Apple includes a lot of apps on the dock. I find that I don't use many of the built-in apps so I removed the ones I don't expect to use. To do that:

    Right-click, select Options, Remove from Dock.


View menu

   Switch to the Finder app. In the Menu Bar, click on View 

    Put a check in use stacks. This organizes the files on the desktop into neat folders. You can uncheck to quickly go back to showing individual files.

     Click on Show Path bar, and show status bar

Customize the toolbar

While in the view menu, click on Customize Toolbars...

I added "Get Info" to the bar and changed "Show" to text and Icon.


Finder

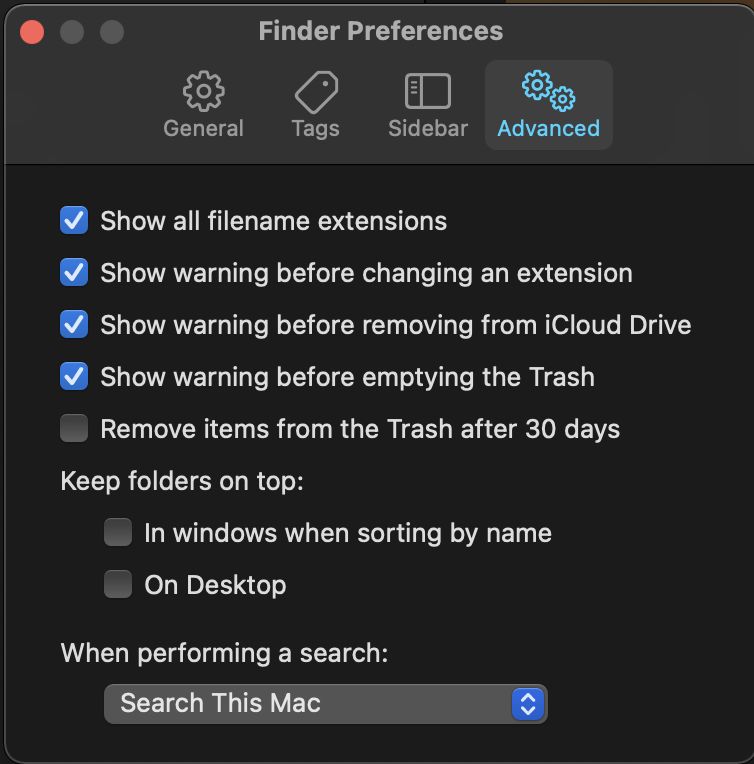
With Finder as the active app, click Finder, Preferences in the menu bar. Click the Advanced tab and put a check in "Show all file extensions in Finder". This prevents a malicious file from hiding its true extension.


One tip for Finder. In the Toolbar, there is a Group tool. If you have mixed file types in a folder it's very convenient to group by Application.


Tips on sorting in Finder


Safari

Keyboard shortcuts and gestures in Safari on Mac

Open Safari Preferences

General

    Uncheck Open "Safe" files after downloading. This a personal OpSec issue. I don't like for files that I download from the Internet to be opened automatically.

    New windows open with: Empty Page - I don't like to wait for a new window to load a page that I probably won't be using.

    New tabs open with: Empty Page


    Advanced

  •         Put a check in Show Develop menu in the menu bar.
  •         Put a check in Show Full Website Address


Extensions

I haven't used Safari as my daily driver before but I'm going to give it a go on the M1 since it's highly optimized for ARM and should give me the best battery life. I can see that I will have to give up some extensions that I am used to on Firefox like vertical tabs, UBlock Origin, Ghostery, etc. but if I get 12 hours of battery life it's a good trade-off.

To install extensions, click Safari in the menu bar, then Safari extensions... to locate extensions for Safari. Similar to Chrome, Firefox, and Edge, Safari extensions are now in the App Store. 


Grammarly

This is a grammar-checking extension. There are versions for Chrome, Firefox, Safari. You will have to create a free account and login to start using Grammarly. I highly recommend it. If you pay for a subscription you can run Grammarly in Microsoft apps.


LastPass 

Open Safari and click the link below to go to the Logmein download site.

How do I install the Safari app extension on my mac

  • Download the lastpass.dmg file.
  • Double click on the dmg, when it opens, drag it into the applications folder.
  • Double click to start it and log in.
  • Back in Safari.
  • Preferences, Extensions, enable the lastpass extension.


Buffer

This is an extension that lets you tweet from Safari. I find it handy when I find an info sec site that I want to share.

Open the App Store, click on Catagories, Safari Extensions. In the search bar enter buffer. You will see Buffer: Social Media Composer.

Click on Get, Install.


Activity monitor 

    Add a column for architecture. This lets you see which apps are running native and which are still Intel.


Time Machine

macOS includes a decent backup application called Time Machine. Since network engineers tend to install a lot of software from Github and other Internet locations, having a full backup is important. There are 3rd party tools like Carbon Copy Cloner and SuperDuper that have a lot more features. At the time of this blog (4-15-2021) SuperDuper hadn't been updated to work with the M1. 

I downloaded the Carbon Copy Cloner trial and it worked with the M1. The Caveat is that it can't make a bootable back. The work around is to install Big Sur manually and then restore. I think for the short term I'm going to stick with Time Machine. The snap shot feature of Carbon Copy Cloner shoulds good but I'm not sure I need it.

At a minimum, you should get Time Machine setup.

Also, I still use a Windows laptop when I'm at the office. If it got crypto locked all of my Dropbox and Goggle Drive files would get overwritten with encrypted versions. Having an offline backup is a necessity if you interact with Windows.

I bought a Elecife M.2 NVME PCIe SATA NGFF SSD Enclosure and a Western Digital 1TB WD Blue SN550 NVMe drive to hold the backups. The enclosure is very nice, tool-free, and lightweight. Not like the old days of using a 2.5" spinning hard drive in an external enclosure. 

As soon as I connected it, Time Machine opened and asked if I wanted to use it. After that, it does a backup every hour and saves weekly and monthly backups. I don't carry the drive with me so I don't do the hourly. I usually just connected it in the evening and let it do one or two backups. 

The NVME is so fast that the backups only take a few minutes.  

I noticed that my .zshrc file wasn't visible in the backup. Use "shift+cmd+." to show hidden files. 

Reference

Back up your Mac with Time Machine


Wrap Up

That does it for the basic setup of the OS. In the next post, I will dive into installing the tools a network engineer needs.

You can find Part Two here
You can find Part Three here