For example, assume we have a company with 5 data closets and each closet uses a different vlan for the access ports. A customer requirement is to have the switch serial number configured as an SNMP location. The customer also has a standard for the hostname and uses RADIUS authentication against a Microsoft NPS server. Additionally, you use SuperPutty to manage the switches.
In Excel you can create a formula to build the NPS server script and the SuperPutty string used in the XML file. If you haven't used Excel to create formulas you should download my sample file and look it over. Excel is a great tool for network configuration once you get formulas down. A simple google for Excel calculation will turn up many websites with examples.
The items in the header row become mail merge items in Word. Here are several of the rows from the sample spread sheet.
A File Open dialog box with open. It ALWAYS opens in "C:\Program Files (x86)\Microsoft Office\Office14\QUERIES" which is very annoying if you use a cloud storage provider for your files. Anyway, navigate to the Excel spread sheet and select it. In my case I have more than one work sheet defined so I saw the following dialog:
This dialog let's you select the workbook to use with the merge. In this case I have two workbooks defined - SITE1 and SITE2. If I am configuring switches for site1 I would obviously select SITE1. Same logic if I was configuring site 2.
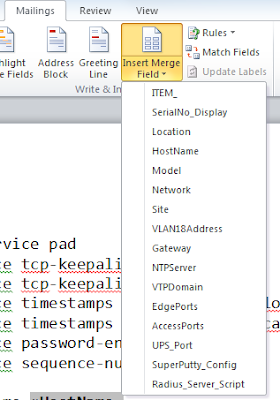
Now that the spread sheet is linked to the Word document we can insert the mail merge fields. Simply navigate to where you need a field then click "Mailings, Insert Merge Field" and select the field. Here is an example of inserting the HostName field:
hostname «HostName».
When the mail merge is executed the «HostName» field will be replaced with the value from the spread sheet. You can create as many merge fields as you need.
Execute the Merge
Once you have added all the merge fields and saved the document you are ready to run it. Click the "Mailings Menu, then Finish and Merge, Edit Individual Documents...
A dialog will open allowing you to select All, Current or From.
The first column in my work book is named item. I don't use it in my switch configuration, it is in the work book so that if I want to configure only one switch I can pick it out easily. To configure the first two switches you would select From: and enter 1 and 2.
As soon as you click Ok the merge will run and a new Word document will open. It will be named Letters1 and will contain all of the configurations. At this point I normally click ctrl+a and then ctrl+x to select all the text and cut it. I then paste it into a notepad to remove any hidden characters that Word may have inserted.
Below is a link to a sample Word document and spread sheet. You will need to change the column headers to meet your needs. If you start with my spread sheet and change the headers you are prompted when running the merge that fields were not found. Simply click "Remove from document" and Word will remove my fields.
I encourage you to download my samples and try it. Once you get the hang of it you will find it's much better than using "Search and replace" to create configurations. It also allows you to "Outsource" creating configs because you can create the template, fill out the spread sheet and then send it to a co-worker who can do the actual configuring. Plus, you can get peer review on the spread sheet to reduce the chance of error.
SuperPutty
To use the SuperPutty item simply edit the formula (use caution as there are a lot of """ character sets in it) to match your SuperPutty format. Then close SuperPutty, open the sessions.xml file in the SuperPutty folder and paste it in. I use Notepad++ and it color codes the XML file making it easier to view. Save the changes and then close the file. When you re-open SuperPutty you will find a folder with the new switches in it.Microsoft Network Policy Server
Setting up a Microsoft Network Policy Server is very easy and will give you a free RADIUS server for switch (or 802.1x) Authentication. Server Standard is limited to 50 devices, Data Center is unlimited.It is a Cisco Best Practice to use RADIUS (or TACACS+) for authentication. If you are using NPS the last column in my spread sheet creates the code needed to configure the device in NPS. Simply open a command line as an administrator and paste the code in. Super simple and it will save a lot of time over manually creating devices in NPS.
My Template
I always try to follow Cisco best practices whenever possible. As you look at the template hopefully you will find some best practices that you can implement in your environment.


Or you can a tool like this https://github.com/ShellVision/SmartNetConf
ReplyDelete